Thursday, March 3, 2016

How to reset user accounts in Oracle 11g on Linux


# su - oracle

$ sqlplus /nolog

SQL> conn /as sysdba

SQL>select limit from dba_profiles where resource_name = 'PASSWORD_REUSE_MAX' AND profile = 'DEFAULT';       <--10...more secure
NOTE: Should be 10....If not, change 10 in the reset command to the output number.

----------------------------------------------------------------------

SQL>alter profile default limit password_reuse_max unlimited;

-----------------------------------------------------------------------
#To see locked or expired users;
SQL>select username, account_status from dba_users;

-----------------------
#To get their passwords;

SQL>select name, password from user$ where name = 'EGD_USER';
----------------------------------------------------------------------- 

#select name,password from user$ where name = 'EGD_USER';  <- Copy the output into the line below: 'ACTUALOUTPUT'

SQL>alter user EGD_USER identified by values '8467F6B603CA4542';   <---paste here
NOTE: This process can be repeated for additional accounts:
            IMINT, GISPROD, DCGS_USER, CMWREMOTE, GPT93


-------------------

SQL>select limit from dba_profiles where resource_name = 'PASSWORD_REUSE_MAX' AND

profile = 'DEFAULT';

NOTE: Should match what it was before you started.  This is a security feature and will be a finding

if not put back.


SQL> alter profile default limit password_reuse_max 10;

#verify the users were reset ;

SQL> select username, account_status from dba_users;


#if account is "locked" still, most times the password is just expired and the account will auto unlock once the password is changed. 

SQL> alter user EGD_USER account unlock;


#Exit disconnects you from Oracle DB.

SQL> exit

#One more “exit” takes you back to root prompt #

$ exit

Replace a String in Multiple Files in Linux Using Grep and Sed

I recently had to replace every occurrence of a certain word / string in a ton of files spanning multiple directories, and this is the quickest way I've found to do it. It uses grep to search for a certain word and if it find its it runs sed to replace the strings you want. Note: This will not work on windows systems

Basic Format

Search for a specific string to see if it exists;
grep -rl 'matchstring' /opt

to change the string;
grep -rl matchstring /opt | xargs sed -i 's/matchstring/matchstring2/g'

to verify strings have been changed run the first command;
grep -rl 'matchstring' /opt

Note: The forward slash '/' delimiter in the sed argument could also be a different delimiter (such as the pipe '|' character). The pipe delimiter might be useful when searching through a lot of html files if you didn't want to escape the forward slash, for instance.

matchstring is the string you want to match, e.g., "football" string1 would ideally be the same string as matchstring, as the matchstring in the grep command will pipe only files with matchstring in them to sed. string2 is the string that replace string1. There may be times when you want to use grep to find only files that have some matchstring and then replace on a different string in the file than matchstring. For example, maybe you have a lot of files and only want to only replace on files that have the matchstring of 'phonenumber' in them, and then replace '555-5555' with '555-1337'. Not that great of an example (you could just search files for that phone number instead of the string 'phonenumber'), but your imagination is probably better than mine.

Example
grep -rl 'windows' ./ | xargs sed -i 's/windows/linux/g'

This will search for the string 'windows' in all files relative to the current directory and replace 'windows' with 'linux' for each occurrence of the string in each file.

Monday, February 29, 2016

Linux Hardening Guide with OpenSCAP 1.2

Install the latest version of openSCAP (v1.2 at the time of writing: http://scap.nist.gov/revision/1.2/index.html#xccdf)

#yum install openscap openscap-utils scap-security-guide

# oscap xccdf eval --profile stig-rhel6-server-upstream --results results.xml --report report.html \
  --cpe /usr/share/xml/scap/ssg/content/ssg-rhel6-cpe-dictionary.xml \
  /usr/share/xml/scap/ssg/content/ssg-rhel6-xccdf.xml

----To remediate some of the findings, use the results.xml file and rerun the scan with the remediate option.------

#oscap xccdf remediate --results results.xml results.xml

--------These are findings that had to be remediated manually.----------------------
## Item: Set Daemon Umask - Failed
# cp -p /etc/init.d/functions{,.preSTIG}
#  var_umask_for_daemons="027" \
   grep -q ^umask /etc/init.d/functions && \
   sed -i "s/umask.*/umask $var_umask_for_daemons/g" /etc/init.d/functions
# if ! [ $? -eq 0 ]; then \
  echo "umask $var_umask_for_daemons" >> /etc/init.d/functions \
  fi
## Note - still failed in a subsequent scan, so manually modified /etc/init.d/functions and set umask to 027

## Item: Enable ExecShield - Unknown (failed)
# if grep --silent ^kernel.exec-shield /etc/sysctl.conf ; then
    sed -i 's/^kernel.exec-shield.*/kernel.exec-shield = 1/g' /etc/sysctl.conf;
  else
    echo "" >> /etc/sysctl.conf;
    echo "# Set kernel.exec-shield to 1 per STIG security requirements" >> /etc/sysctl.conf;
    echo "kernel.exec-shield = 1" >> /etc/sysctl.conf;
  fi

## Item: Enable Randomized Layout of Virtual Address Space - Unknown (failed)
# if grep --silent ^kernel.randomize_va_space /etc/sysctl.conf ; then
    sed -i 's/^kernel.randomize_va_space.*/kernel.randomize_va_space = 2/g' /etc/sysctl.conf
  else
    echo "" >> /etc/sysctl.conf
    echo "# Set kernel.randomize_va_space to 2 per STIG security requirements" >> /etc/sysctl.conf
    echo "kernel.randomize_va_space = 2" >> /etc/sysctl.conf
  fi

## Item: Ensure No Device Files are Unlabeled by SELinux - Fail (False Positive) Manually verified
# find /dev -context "*:*:unlabeled_t:*" -ls
# or run this command
# find /dev -context *:device_t:* \( -type c -o -type b \) -printf "%p %Z\n"

## Item: Ensure that System Accounts Do Not Run a Shell Upon Login - Failed (exceptions below)
# cat /etc/passwd |grep -v nologin
% The following exceptions are noted
sync:x:5:0:sync:/sbin:/bin/sync                [<- appropriate OS shell for this user]
shutdown:x:6:0:shutdown:/sbin:/sbin/shutdown   [<- appropriate OS shell for this user]
halt:x:7:0:halt:/sbin:/sbin/halt               [<- appropriate OS shell for this user]
postgres:x:26:26:PostgreSQL Server:/var/lib/pgsql:/bin/bash  [<- appropriate OS shell for this user]
amandabackup:x:33:6:Amanda user:/var/lib/amanda:/bin/bash    [<- appropriate OS shell for this user]
mysql:x:27:27:MySQL Server:/var/lib/mysql:/bin/bash          [<- appropriate OS shell for this user]
##Disable xguest account
# vi /etc/passwd
% set shell for xguest user to /sbin/nologin
## Item: Verify All Account Password Hashes are Shadowed - Fail (False Positive) Manually verified
# awk -F: '$2 !~ /^x$/ {print}' /etc/passwd
## Item: All GIDs referenced in /etc/passwd must be defined in /etc/group - notchecked (passed) Manually verified
# awk -F: '{print $4}' /etc/passwd |while read gid
  do
    getent group $gid > /dev/null || echo "GID: $gid not found - NEEDS FIX"
  done
## Alternate check - see if results mention bad or invalid group settings
# pwck -r
# grpck -r

## Item: Ensure All Accounts on the System Have Unique Names - notchecked (passed) Manually verify
# pwck -r

## Item: Assign Expiration Date to Temporary Accounts - notchecked (passed) Manually verify
# awk -F: '$2 !~/[!*]/ {print $1}' /etc/shadow | egrep -v root | while read user
  do
    echo "User: $user"
    chage -l $user; done
  done
# date -d "1 year"
# chage -E '2016-10-12' ciadmin

## Item: Set last Logon/Access Notification - fail (passed)
# vi /etc/pam.d/system-auth
#   session       required     pam_lastlog.so showfailed

## Item: Set Password to Maximum of Three Consecutive Repeating Characters - Failed (passed)
# cp -p /etc/pam.d/system-auth-ac{,.preSTIG}
# var_password_pam_maxrepeat="3"
if grep -q "maxrepeat=" /etc/pam.d/system-auth; then
    sed -i --follow-symlink "s/\(maxrepeat *= *\).*/\1$var_password_pam_maxrepeat/" /etc/pam.d/system-auth
else
    sed -i --follow-symlink "/pam_cracklib.so/ s/$/ maxrepeat=$var_password_pam_maxrepeat/" /etc/pam.d/system-auth
fi
# or manually set "/etc/pam.d/system-auth-ac"
password    requisite     pam_cracklib.so try_first_pass retry=3 type= maxrepeat=3

## Item: Ensure no world-writable files exist
# find / -perm -2 ! -type l -ls

## Item: Ensure All files are owned by a User - Failed (passes) Manually set user
# find / -nouser
# chown root /"directory or file to set"
## Item: Ensure All files are owned by a Group - Failed (passes) Manually set group
# find / -nogroup
# chgrp root /"directory or file to set"
## Item: Ensure World-Wide directories are owned by a system account
# find (/dev/sda1) -xdev -type d -perm 0002 -uid +500 -print  (partition to scan) - Failed (passes) Manually verify

## Item: Set Lockout Time For Failed Password Attempts - CCE-27110-6 - Failed (passed)
## Item: Set Interval For Counting Failed Password Attempts - CCE-27215-3 - Failed (passed)
# cp -p /etc/pam.d/password-auth-ac{,.preSTIG}
# vi /etc/pam.d/password-auth-ac  (<- add section for unlock_time and fail_interval)
--
auth        required      pam_faillock.so preauth silent deny=3 unlock_time=604800 fail_interval=900
auth        sufficient    pam_unix.so  try_first_pass
auth        [default=die] pam_faillock.so authfail deny=3 unlock_time=604800 fail_interval=900
--
# vi /etc/pam.d/system-auth-ac (<- add section for unlock_time and fail_interval)
--
auth        required      pam_faillock.so preauth silent deny=3 unlock_time=604800 fail_interval=900
auth        sufficient    pam_unix.so  try_first_pass
auth        [default=die] pam_faillock.so authfail deny=3 unlock_time=604800 fail_interval=900
--

## Item: Set Boot Loader Password - CCE-26911-8 - Failed (passed)
# grub-crypt --sha-512
#    Password:(<- use root password here)
# cp -p /etc/grub.conf{,.preSTIG}
# vi /etc/grub.conf
-----modify grub.conf by adding password line-----
default=0
timeout=5
splashimage=(hd0,0)/grub/splash.xpm.gz
hiddenmenu
password --encrypted $6$ZpeyOFUd2tSpcvW9$kK..<hash-stuff-here>...
--

## Item: Disable Ctrl-Alt-Del Reboot Activation - CCE-27567-7 - Failed (passed)
# vi /etc/init/control-alt-delete.conf
--
exec /usr/bin/logger -p security.info "Control-Alt-Delete pressed"
--

## Item: Result for Disable Interactive Boot - CCE-27043-9 - Failed (passed)
# cp -p /etc/sysconfig/init{,.preSTIG}
# grep -q ^PROMPT /etc/sysconfig/init && \
  sed -i "s/PROMPT.*/PROMPT=no/g" /etc/sysconfig/init
  if ! [ $? -eq 0 ]; then
    echo "PROMPT=no" >> /etc/sysconfig/init
  fi

## Item: Set GNOME Login Inactivity Timeout - CCE-26828-4 - Unknown (passed)
# inactivity_timeout_value="15"
# gconftool-2 --direct \
            --config-source "xml:readwrite:/etc/gconf/gconf.xml.mandatory" \
            --type int \
            --set /desktop/gnome/session/idle_delay ${inactivity_timeout_value}

## Item: GNOME Desktop Screensaver Mandatory Use - CCE-26600-7 - Unknown (passed)
# gconftool-2 --direct \
            --config-source "xml:readwrite:/etc/gconf/gconf.xml.mandatory" \
            --type bool \
            --set /apps/gnome-screensaver/idle_activation_enabled true

## Item: Enable Screen Lock Activation After Idle Period - CCE-26235-2 - Unknown (passed)
# gconftool-2 --direct \
            --config-source "xml:readwrite:/etc/gconf/gconf.xml.mandatory" \
            --type bool \
            --set /apps/gnome-screensaver/lock_enabled true

## Item: Implement Blank Screensaver - CCE-26638-7 - Unknown (passed)
# gconftool-2 --direct \
            --config-source "xml:readwrite:/etc/gconf/gconf.xml.mandatory" \
            --type string \
            --set /apps/gnome-screensaver/mode blank-only

## Item: Enable Smart Card Login - CCE-27440-7 - Failed (failed)
% Not resolved; no Smart Card readers on system

## Item: Enable GUI Warning Banner - CCE-27195-7 - Unknown (passed)
# gconftool-2 --direct \
            --config-source "xml:readwrite:/etc/gconf/gconf.xml.mandatory" \
            --type bool \
            --set /apps/gdm/simple-greeter/banner_message_enable true

## Item: Set GUI Warning Banner Text - CCE-27017-3 - Unknown (passed)
# login_banner_text="You[\s\n]+are[\s\n]+accessing[\s\n]+a[\s\n]+U.S.[\s\n]+Government[\s\n]+\(USG\)[\s\n]+Information[\s\n]+System[\s\n]+\(IS\)[\s\n]+that[\s\n]+is[\s\n]+provided[\s\n]+for[\s\n]+USG-authorized[\s\n]+use[\s\n]+only.[\s\n]*By[\s\n]+using[\s\n]+this[\s\n]+IS[\s\n]+\(which[\s\n]+includes[\s\n]+any[\s\n]+device[\s\n]+attached[\s\n]+to[\s\n]+this[\s\n]+IS\),[\s\n]+you[\s\n]+consent[\s\n]+to[\s\n]+the[\s\n]+following[\s\n]+conditions\:[\s\n]*-[\s\n]*The[\s\n]+USG[\s\n]+routinely[\s\n]+intercepts[\s\n]+and[\s\n]+monitors[\s\n]+communications[\s\n]+on[\s\n]+this[\s\n]+IS[\s\n]+for[\s\n]+purposes[\s\n]+including,[\s\n]+but[\s\n]+not[\s\n]+limited[\s\n]+to,[\s\n]+penetration[\s\n]+testing,[\s\n]+COMSEC[\s\n]+monitoring,[\s\n]+network[\s\n]+operations[\s\n]+and[\s\n]+defense,[\s\n]+personnel[\s\n]+misconduct[\s\n]+\(PM\),[\s\n]+law[\s\n]+enforcement[\s\n]+\(LE\),[\s\n]+and[\s\n]+counterintelligence[\s\n]+\(CI\)[\s\n]+investigations.[\s\n]*-[\s\n]*At[\s\n]+any[\s\n]+time,[\s\n]+the[\s\n]+USG[\s\n]+may[\s\n]+inspect[\s\n]+and[\s\n]+seize[\s\n]+data[\s\n]+stored[\s\n]+on[\s\n]+this[\s\n]+IS.[\s\n]*-[\s\n]*Communications[\s\n]+using,[\s\n]+or[\s\n]+data[\s\n]+stored[\s\n]+on,[\s\n]+this[\s\n]+IS[\s\n]+are[\s\n]+not[\s\n]+private,[\s\n]+are[\s\n]+subject[\s\n]+to[\s\n]+routine[\s\n]+monitoring,[\s\n]+interception,[\s\n]+and[\s\n]+search,[\s\n]+and[\s\n]+may[\s\n]+be[\s\n]+disclosed[\s\n]+or[\s\n]+used[\s\n]+for[\s\n]+any[\s\n]+USG-authorized[\s\n]+purpose.[\s\n]*-[\s\n]*This[\s\n]+IS[\s\n]+includes[\s\n]+security[\s\n]+measures[\s\n]+\(e.g.,[\s\n]+authentication[\s\n]+and[\s\n]+access[\s\n]+controls\)[\s\n]+to[\s\n]+protect[\s\n]+USG[\s\n]+interests[\s\n]+--[\s\n]+not[\s\n]+for[\s\n]+your[\s\n]+personal[\s\n]+benefit[\s\n]+or[\s\n]+privacy.[\s\n]*-[\s\n]*Notwithstanding[\s\n]+the[\s\n]+above,[\s\n]+using[\s\n]+this[\s\n]+IS[\s\n]+does[\s\n]+not[\s\n]+constitute[\s\n]+consent[\s\n]+to[\s\n]+PM,[\s\n]+LE[\s\n]+or[\s\n]+CI[\s\n]+investigative[\s\n]+searching[\s\n]+or[\s\n]+monitoring[\s\n]+of[\s\n]+the[\s\n]+content[\s\n]+of[\s\n]+privileged[\s\n]+communications,[\s\n]+or[\s\n]+work[\s\n]+product,[\s\n]+related[\s\n]+to[\s\n]+personal[\s\n]+representation[\s\n]+or[\s\n]+services[\s\n]+by[\s\n]+attorneys,[\s\n]+psychotherapists,[\s\n]+or[\s\n]+clergy,[\s\n]+and[\s\n]+their[\s\n]+assistants.[\s\n]+Such[\s\n]+communications[\s\n]+and[\s\n]+work[\s\n]+product[\s\n]+are[\s\n]+private[\s\n]+and[\s\n]+confidential.[\s\n]+See[\s\n]+User[\s\n]+Agreement[\s\n]+for[\s\n]+details."
banner_expanded=$(echo "$login_banner_text" | sed 's/\[\\s\\n\][*+]/ /g;s/\\//g;')
# Set the text shown by the GNOME Display Manager in the login screen
gconftool-2 --direct \
            --config-source "xml:readwrite:/etc/gconf/gconf.xml.mandatory" \
            --type string \
            --set /apps/gdm/simple-greeter/banner_message_text "${banner_expanded}"

## Item: Disable Kernel Parameter for Sending ICMP Redirects by Default - CCE-27001-7 - Unknown (passed)
# if grep --silent ^net.ipv4.conf.default.send_redirects /etc/sysctl.conf ; then
    sed -i 's/^net.ipv4.conf.default.send_redirects.*/net.ipv4.conf.default.send_redirects = 0/g' /etc/sysctl.conf
  else
    echo "" >> /etc/sysctl.conf
    echo "# Set net.ipv4.conf.default.send_redirects to 0 per STIG security requirements" >> /etc/sysctl.conf
    echo "net.ipv4.conf.default.send_redirects = 0" >> /etc/sysctl.conf
  fi

## Item: Disable Kernel Parameter for Sending ICMP Redirects for All Interfaces - CCE-27004-1 - Unknown (passed)
# if grep --silent ^net.ipv4.conf.all.send_redirects /etc/sysctl.conf ; then
    sed -i 's/^net.ipv4.conf.all.send_redirects.*/net.ipv4.conf.all.send_redirects = 0/g' /etc/sysctl.conf
  else
    echo "" >> /etc/sysctl.conf
    echo "# Set net.ipv4.conf.all.send_redirects to 0 per security requirements" >> /etc/sysctl.conf
    echo "net.ipv4.conf.all.send_redirects = 0" >> /etc/sysctl.conf
  fi

## Disable Kernel Parameter for IP Forwarding - CCE-26866-4 - Unknownn (passed)
% Note: no fix on this was needed
# if grep --silent ^net.ipv4.ip_forward /etc/sysctl.conf ; then
    sed -i 's/^net.ipv4.ip_forward.*/net.ipv4.ip_forward = 0/g' /etc/sysctl.conf
  else
    echo "" >> /etc/sysctl.conf
    echo "# Set net.ipv4.ip_forward to 0 per STIG security requirements" >> /etc/sysctl.conf
    echo "net.ipv4.ip_forward = 0" >> /etc/sysctl.conf
  fi
## Need to set sysctl as well as changing the sysctl.conf (only read at startup)
# sysctl -w net.ipv4.ip_forward=0

## Item: Disable Kernel Parameter for Accepting Source-Routed Packets for All Interfaces - CCE-27037-1 - Unknown (passed)
# if grep --silent ^net.ipv4.conf.all.accept_source_route /etc/sysctl.conf ; then
    sed -i 's/^net.ipv4.conf.all.accept_source_route.*/net.ipv4.conf.all.accept_source_route = 0/g' /etc/sysctl.conf
  else
    echo "" >> /etc/sysctl.conf
    echo "# Set net.ipv4.conf.all.accept_source_route to 0 per STIG security requirements" >> /etc/sysctl.conf
    echo "net.ipv4.conf.all.accept_source_route = 0" >> /etc/sysctl.conf
  fi

## Item: Disable Kernel Parameter for Accepting ICMP Redirects for All Interfaces - CCE-27027-2 - Unknownn (passed)
# if grep --silent ^net.ipv4.conf.all.accept_redirects /etc/sysctl.conf ; then
    sed -i 's/^net.ipv4.conf.all.accept_redirects.*/net.ipv4.conf.all.accept_redirects = 0/g' /etc/sysctl.conf
  else
    echo "" >> /etc/sysctl.conf
    echo "# Set net.ipv4.conf.all.accept_redirects to 0 per security requirements" >> /etc/sysctl.conf
    echo "net.ipv4.conf.all.accept_redirects = 0" >> /etc/sysctl.conf
  fi

## Item: Disable Kernel Parameter for Accepting Secure Redirects for All Interfaces - CCE-26854-0 - Unknown (passed)
# if grep --silent ^net.ipv4.conf.all.secure_redirects /etc/sysctl.conf ; then
    sed -i 's/^net.ipv4.conf.all.secure_redirects.*/net.ipv4.conf.all.secure_redirects = 0/g' /etc/sysctl.conf
  else
    echo "" >> /etc/sysctl.conf
    echo "# Set net.ipv4.conf.all.secure_redirects to 0 per security requirements" >> /etc/sysctl.conf
    echo "net.ipv4.conf.all.secure_redirects = 0" >> /etc/sysctl.conf
  fi

## Item: Enable Kernel Parameter to Log Martian Packets - CCE-27066-0 - Unknown (passed)
# if grep --silent ^net.ipv4.conf.all.log_martians /etc/sysctl.conf ; then
    sed -i 's/^net.ipv4.conf.all.log_martians.*/net.ipv4.conf.all.log_martians = 1/g' /etc/sysctl.conf
  else
    echo "" >> /etc/sysctl.conf
    echo "# Set net.ipv4.conf.all.log_martians to 1 per security requirements" >> /etc/sysctl.conf
    echo "net.ipv4.conf.all.log_martians = 1" >> /etc/sysctl.conf
  fi

## Item: Disable Kernel Parameter for Accepting Source-Routed Packets By Default - CCE-26983-7 - Unknown (passed)
# if grep --silent ^net.ipv4.conf.default.accept_source_route /etc/sysctl.conf ; then
    sed -i 's/^net.ipv4.conf.default.accept_source_route.*/net.ipv4.conf.default.accept_source_route = 0/g' /etc/sysctl.conf
  else
    echo "" >> /etc/sysctl.conf
    echo "# Set net.ipv4.conf.default.accept_source_route to 0 per security requirements" >> /etc/sysctl.conf
    echo "net.ipv4.conf.default.accept_source_route = 0" >> /etc/sysctl.conf
  fi

## Item: Disable Kernel Parameter for Accepting ICMP Redirects By Default - CCE-27015-7 - Unknown (passed)
# if grep --silent ^net.ipv4.conf.default.accept_redirects /etc/sysctl.conf ; then
    sed -i 's/^net.ipv4.conf.default.accept_redirects.*/net.ipv4.conf.default.accept_redirects = 0/g' /etc/sysctl.conf
  else
    echo "" >> /etc/sysctl.conf
    echo "# Set net.ipv4.conf.default.accept_redirects to 0 per security requirements" >> /etc/sysctl.conf
    echo "net.ipv4.conf.default.accept_redirects = 0" >> /etc/sysctl.conf
  fi

## Item: Disable Kernel Parameter for Accepting Secure Redirects By Default - CCE-26831-8 - Unknown (passed)
# if grep --silent ^net.ipv4.conf.default.secure_redirects /etc/sysctl.conf ; then
    sed -i 's/^net.ipv4.conf.default.secure_redirects.*/net.ipv4.conf.default.secure_redirects = 0/g' /etc/sysctl.conf
  else
    echo "" >> /etc/sysctl.conf
    echo "# Set net.ipv4.conf.default.secure_redirects to 0 per security requirements" >> /etc/sysctl.conf
    echo "net.ipv4.conf.default.secure_redirects = 0" >> /etc/sysctl.conf
  fi

## Item: Enable Kernel Parameter to Ignore ICMP Broadcast Echo Requests - CCE-26883-9 - Unknown (passed)
# if grep --silent ^net.ipv4.icmp_echo_ignore_broadcasts /etc/sysctl.conf ; then
    sed -i 's/^net.ipv4.icmp_echo_ignore_broadcasts.*/net.ipv4.icmp_echo_ignore_broadcasts = 1/g' /etc/sysctl.conf
  else
    echo "" >> /etc/sysctl.conf
    echo "# Set net.ipv4.icmp_echo_ignore_broadcasts to 1 per security requirements" >> /etc/sysctl.conf
    echo "net.ipv4.icmp_echo_ignore_broadcasts = 1" >> /etc/sysctl.conf
  fi

## Item:  Enable Kernel Parameter to Ignore Bogus ICMP Error Responses - CCE-26993-6 - Unknown (passed)
# if grep --silent ^net.ipv4.icmp_ignore_bogus_error_responses /etc/sysctl.conf ; then
    sed -i 's/^net.ipv4.icmp_ignore_bogus_error_responses.*/net.ipv4.icmp_ignore_bogus_error_responses = 1/g' /etc/sysctl.conf
  else
    echo "" >> /etc/sysctl.conf
    echo "# Set net.ipv4.icmp_ignore_bogus_error_responses to 1 per security requirements" >> /etc/sysctl.conf
    echo "net.ipv4.icmp_ignore_bogus_error_responses = 1" >> /etc/sysctl.conf
  fi

## Item: Enable Kernel Parameter to Use TCP Syncookies - CCE-27053-8 - Unknown (passed)
# if grep --silent ^net.ipv4.tcp_syncookies /etc/sysctl.conf ; then
    sed -i 's/^net.ipv4.tcp_syncookies.*/net.ipv4.tcp_syncookies = 1/g' /etc/sysctl.conf
  else
    echo "" >> /etc/sysctl.conf
    echo "# Set net.ipv4.tcp_syncookies to 1 per security requirements" >> /etc/sysctl.conf
    echo "net.ipv4.tcp_syncookies = 1" >> /etc/sysctl.conf
  fi

## Item: Enable Kernel Parameter to Use Reverse Path Filtering for All Interfaces - CCE-26979-5 - Unknown (passed)
# if grep --silent ^net.ipv4.conf.all.rp_filter /etc/sysctl.conf ; then
    sed -i 's/^net.ipv4.conf.all.rp_filter.*/net.ipv4.conf.all.rp_filter = 1/g' /etc/sysctl.conf
  else
    echo "" >> /etc/sysctl.conf
    echo "# Set net.ipv4.conf.all.rp_filter to 1 per security requirements" >> /etc/sysctl.conf
    echo "net.ipv4.conf.all.rp_filter = 1" >> /etc/sysctl.conf
  fi

## Item: Enable Kernel Parameter to Use Reverse Path Filtering by Default - CCE-26915-9 - Unknown (passed)
# if grep --silent ^net.ipv4.conf.default.rp_filter /etc/sysctl.conf ; then
    sed -i 's/^net.ipv4.conf.default.rp_filter.*/net.ipv4.conf.default.rp_filter = 1/g' /etc/sysctl.conf
  else
    echo "" >> /etc/sysctl.conf
    echo "# Set net.ipv4.conf.default.rp_filter to 1 per security requirements" >> /etc/sysctl.conf
    echo "net.ipv4.conf.default.rp_filter = 1" >> /etc/sysctl.conf
  fi

## Item: Disable Accepting IPv6 Redirects - CCE-27166-8 - Unknown (passed)
# if grep --silent ^net.ipv6.conf.default.accept_redirects /etc/sysctl.conf ; then
    sed -i 's/^net.ipv6.conf.default.accept_redirects.*/net.ipv6.conf.default.accept_redirects = 0/g' /etc/sysctl.conf
  else
    echo "" >> /etc/sysctl.conf
    echo "# Set net.ipv6.conf.default.accept_redirects to 0 per security requirements" >> /etc/sysctl.conf
    echo "net.ipv6.conf.default.accept_redirects = 0" >> /etc/sysctl.conf
  fi
## The above setting does not work - instead disable ipv6
# in /etc/sysconfig/network: NETWORKING_IPV6=no
# in /etc/sysconfig/network-scripts/ifcfg-eth#: IPV6INIT=no
# Disable ip6tables: chkconfig --level 345 ip6tables off
## Item: Disable DCCP Support - CCE-26448-1 - Failed (passed)
# echo "install dccp /bin/false" > /etc/modprobe.d/dccp.conf
## Item: Disable SCTP Support - CCE-26410-1 - Failed (passed)
# echo "install sctp /bin/false" > /etc/modprobe.d/sctp.conf
## Item: Disable RDS Support - CCE-26239-4 - Failed (passed)
# echo "install rds /bin/false" > /etc/modprobe.d/rds.conf
## Item:  Disable TIPC Support - CCE-26696-5 - Failed (passed)
# echo "install tipc /bin/false" > /etc/modprobe.d/tipc.conf
## Item: Ensure Log Files Are Owned By Appropriate User - CCE-26812-8 - Fail (passed)
# chown root /var/log/*
% The following exceptions are noted
ntpstats/ user = ntp      [<-- by default, ntpd runs as ntp:ntp, see /etc/sysconfig/ntpd]
radius/   user = radiusd  [<-- by default, radiusd runs as radiusd:radiusd, see /etc/raddb/radiusd.conf]
## Item: Ensure Log Files Are Owned By Appropriate Group - CCE-26821-9 - Fail (passed)
# chgrp root /var/log/*
% The following exceptions are noted
ntpstats/ group = ntp      [<-- by default, ntpd runs as ntp:ntp, see /etc/sysconfig/ntpd]
radius/   group = radiusd  [<-- by default, radiusd runs as radiusd:radiusd, see /etc/raddb/radiusd.conf]
btmp      group = utmp     [<-- by default, not rwx by group other]
gdm/      group = gdm      [<-- by default, not rwx by group other]
wtmp      group = utmp     [<-- by default, not wx by group other]
## Item: Ensure System Log Files Have Correct Permissions - CCE-27190-8 - Fail (passed)
# find /var/log -type d -exec chmod 700 {} \;
# find /var/log -type f -exec chmod 600 {} \;
## Item: Record attempts to alter time through adjtimex - CCE-26242-8 - Unknown (passed)
## Item: Record attempts to alter time through settimeofday - CCE-27203-9 - Unknown (passed)
## Item: Record Attempts to Alter Time Through stime - CCE-27169-2 - Unknown (passed)
## Item: Record Attempts to Alter Time Through clock_settime - CCE-27170-0 - Unknown (passed)
## Item: Record Events that Modify the System's Discretionary Access Controls - chmod - CCE-26280-8 - Unknown (passed)
## Item: Record Events that Modify the System's Discretionary Access Controls - chown - CCE-27173-4 - Unknown (passed)
## Item: Record Events that Modify the System's Discretionary Access Controls - fchmod - CCE-27174-2 - Unknown (passed)
## Item: Record Events that Modify the System's Discretionary Access Controls - fchmodat - CCE-27175-9 - Unknown (passed)
## Item: Record Events that Modify the System's Discretionary Access Controls - fchown - CCE-27177-5 - Unknown (passed)
## Item: Record Events that Modify the System's Discretionary Access Controls - fchownat - CCE-27178-3 - Unknown (passed)
## Item: Record Events that Modify the System's Discretionary Access Controls - fremovexattr - CCE-27179-1 - Unknown (passed)
## Item: Record Events that Modify the System's Discretionary Access Controls - fsetxattr - CCE-27180-9 - Unknown (passed)
## Item: Record Events that Modify the System's Discretionary Access Controls - lchown - CCE-27181-7 - Unknown (passed)
## Item: Record Events that Modify the System's Discretionary Access Controls - lremovexattr - CCE-27182-5 - Unknown (passed)
## Item: Record Events that Modify the System's Discretionary Access Controls - lsetxattr - CCE-27183-3 - Unknown (passed)
## Item: Record Events that Modify the System's Discretionary Access Controls - removexattr - CCE-27184-1 - Unknown (passed)
## Item: Record Events that Modify the System's Discretionary Access Controls - setxattr - CCE-27185-8 - Unknown (passed)
# cd /etc/audit
# rm {rules.d,}/audit.rules
# cp /usr/share/doc/audit-2.3.7/stig.rules audit.rules
# Item: Ensure auditd Collects Information on Kernel Module Loading and Unloading - CCE-26611-4 - Fail (passed)
# vi /etc/audit/audit.rules  (<- uncomment the lines below)
--
-w /sbin/insmod -p x -k modules
-w /sbin/rmmod -p x -k modules
-w /sbin/modprobe -p x -k modules
-a always,exit -F arch=b32 -S init_module -S delete_module -k modules
-a always,exit -F arch=b64 -S init_module -S delete_module -k modules
--
##
# vi /etc/audit/audit.rules (<- add rmdir to the lines below)
--
-a always,exit -F arch=b32 -S rmdir -S unlink -S unlinkat -S rename -S renameat -F auid>=500 -F auid!=4294967295 -k delete
-a always,exit -F arch=b64 -S rmdir -S unlink -S unlinkat -S rename -S renameat -F auid>=500 -F auid!=4294967295 -k delete
--
## Item: Ensure auditd Collects Information on the Use of Privileged Commands - CCE-26457-2 - Fail (passed)
# fs="/ /boot /export/home /tmp /usr /var /var/log /var/log/audit"
# find $fs -xdev -type f -perm -4000 -o -type f -perm -2000  > /tmp/suid-files.txt 2>/dev/null
# for i in $(cat /tmp/suid-files.txt)
  do
    echo "-a always,exit -F path=$i -F perm=x -F auid>=500 -F auid!=4294967295 -k privileged" >> /etc/audit/rules.d/suid-files.rules
  done

## Item: Uninstall Sendmail Package - CCE-27515-6 - Fail (passed)
# yum erase sendmail

## Item: Configure LDAP Client to Use TLS For All Transactions - CCE-26690-8 - Fail (passed)
# cp -p /etc/pam_ldap.conf{,.preSTIG}
# vi /etc/pam_ldap.conf
--
ssl start_tls  (<- uncomment line)
--
## Item: Configure Certificate Directives for LDAP Use of TLS - CCE-27189-0 - Fail (passed)
# vi /etc/pam_ldap.conf
--
tls_cacertdir /etc/ssl/certs (<- uncomment line)
--
## Item: Enable Logging of All FTP Transactions - CCE-27142-9 - Fail (passed)
# cp -p /etc/vsftpd/vsftpd.conf{,.preSTIG}
# vi /etc/vsftpd/vsftpd.conf
--
xferlog_std_format=NO  (<- changed from YES)
log_ftp_protocol=YES (<- added at end of file)
--
## Item:  Create Warning Banners for All FTP Users - CCE-27145-2 - Fail (passed)
# vi /etc/vsftpd/vsftpd.conf
--
banner_file=/etc/issue (<- added at end of file)
--
## Item: Configure SNMP Service to Use Only SNMPv3 or Newer - CCE-27365-6 - Fail (passed)
## Item: Ensure Default Password Is Not Used - CCE-27593-3 - Fail (passed)
# cp -p /etc/snmp/snmpd.conf{,.preSTIG}
# vi /etc/snmp/snmpd.conf
--
# com2sec notConfigUser  default       public (<- comment line out)
--
## Item: Add noexec Option to Removable Media Partitions - CCE-27196-5 - Fail (passed)
# vi /etc/fstab
/dev/cdrom         /media/cdrom         iso9660 noauto,owner,ro,noexec 0 0

# vi /etc/auto.misc
cd    -fstype=iso9660,ro,nosuid,nodev,noexec  :/dev/cdrom
--
## Item: Install Intrusion Detection Software - CCE-27409-2 - Not Checked (passed)
# yum install dialog.x86_64
# rpm -Uvh rsiide-for-linux-srv-9.1.0.0-1.0.noarch.rpm
##Add the following to /etc/audit/audit.rules
-w /sbin/shutdown -p x
-w /sbin/init -p x
##Fix selinux bug with log rotation
#semodule -i /etc/RSIIDE_Config/RSIIDE_SELINUX_RHEL6_NFS.pp
#semodule -i /etc/RSIIDE_Config/RSIIDE_SELINUX_RHEL6_DEFAULT.pp
## Add the following to /Audit/config/linux.systems.txt localhost
## Modify /Audit/config/rsiide.linux.conf
wh_starting_hour:5
wh_ending_hour:20
cli_INSTALL Clamav installed (yes or no):no
uvd_PATH to binary:/usr/local/uvscan
uvi_INSTALL Mcafee installed (yes or no):yes

## Item: Verify that System Executables Have Root Ownership - CCE-27623-8 - Fail (passed)
## cd to each directory (/bin, /usr/bin, /usr/local/bin, /sbin/usr/sbin, /usr/local/sbin) and run the following:
# find . \! -user root -print
% The following exceptions are noted
/usr/sbin RPMs owned by  amandabackup   [<-- by default, amandabackup is a service account with no password set]

## Item: Uninstall xinetd Package - CCE-27005-8 - Fail (mitigated)
## Verify xinetd is chkconfig off for all runlevels
# chkconfig --list |grep xinetd
## chkconfig xinetd for all runlevels
# chkconfig --level 0123456 xinetd off
# Verify all xinetd services (/etc/xinetd.d) have setting "disable = yes"

## Item: Uninstall tftp-server Package - CCE-26946-4 - Fail (mitigated)
## Verify /etc/xinetd.d/tftp has setting "disable = yes"

## Set the default run level to 3 (no X11)
# vi /etc/inittab
  id:3:initdefault:


## Disable X11 by setting the default run level to 3 (no X11)
# vi /etc/inittab
  id:3:initdefault:

## Run the following command to see what has changed
# rpm -Va |grep '^..5'

Monday, October 19, 2015

Bash Shell PS1: Examples to customize your Linux Prompt

1. Display username, hostname and current working directory in the prompt

The PS1 in this example displays the following three information in the prompt:
  • \u – Username
  • \h – Hostname
  • \w – Full path of the current working directory
-bash-3.2$ export PS1="\u@\h \w> "

user@hostname ~> cd /etc/mail

user@hostname /etc/mail>

2. Display current time in the prompt

In the PS1 environment variable, you can directly execute any Linux command, by specifying in the format $(linux_command). In the following example, the command $(date) is executed to display the current time inside the prompt.
user@hostname ~> export PS1="\u@\h [\$(date +%k:%M:%S)]> "

user@hostname [11:09:56]>

You can also use \t to display the current time in the hh:mm:ss format as shown below:
user@hostname ~> export PS1="\u@\h [\t]> "

user@hostname [12:42:55]>

You can also use \@ to display the current time in 12-hour am/pm format as shown below:
user@hostname ~> export PS1="[\@] \u@\h> "

[04:12 PM] user@hostname >

3. Display output of any Linux command in the prompt

You can display output of any Linux command in the prompt. The following example displays three items separated by | (pipe) in the command prompt:
  • \!: The history number of the command
  • \h: hostname
  • $kernel_version: The output of the uname -r command from $kernel_version variable
  • \$?: Status of the last command
user@hostname ~> kernel_version=$(uname -r)
user@hostname ~> export PS1="\!|\h|$kernel_version|\$?> "

473|hostname|2.6.25-14.fc9.i686|0>

4. Change foreground color of the prompt

Display prompt in blue color, along with username, host and current directory information.

$ export PS1="\e[0;34m\u@\h \w> \e[m"
[Note: For light blue prompt]

$ export PS1="\e[1;34m\u@\h \w> \e[m"
[Note: For dark blue prompt]
  • \e[ – Indicates the beginning of color prompt
  • x;ym – Indicates color code. Use the color code values mentioned below.
  • \e[m – indicates the end of color prompt
Color Code Table:
Black 0;30
Blue 0;34
Green 0;32
Cyan 0;36
Red 0;31
Purple 0;35
Brown 0;33
[Note: Replace 0 with 1 for dark color]

Make the color change permanent by adding the following lines to .bash_profile or .bashrc
STARTCOLOR='\e[0;34m';
ENDCOLOR="\e[0m"
export PS1="$STARTCOLOR\u@\h \w> $ENDCOLOR"

5. Change background color of the prompt

Change the background color by specifying \e[{code}m in the PS1 prompt as shown below.
$ export PS1="\e[47m\u@\h \w> \e[m"
[Note: For Light Gray background]

Combination of background and foreground
export PS1="\e[0;34m\e[47m\u@\h \w> \e[m"
[Note: For Light Blue foreground and Light Gray background]

Add the following to the .bash_profile or .bashrc to make the above background and foreground color permanent.
STARTFGCOLOR='\e[0;34m';
STARTBGCOLOR="\e[47m"
ENDCOLOR="\e[0m"
export PS1="$STARTFGCOLOR$STARTBGCOLOR\u@\h \w> $ENDCOLOR"
Play around by using the following background color and choose the one that suites your taste:
  • \e[40m
  • \e[41m
  • \e[42m
  • \e[43m
  • \e[44m
  • \e[45m
  • \e[46m
  • \e[47m

6. Display multiple colors in the prompt

You can also display multiple colors in the same prompt. Add the following function to .bash_profile
function prompt {
  local BLUE="\[\033[0;34m\]"
  local DARK_BLUE="\[\033[1;34m\]"
  local RED="\[\033[0;31m\]"
  local DARK_RED="\[\033[1;31m\]"
  local NO_COLOR="\[\033[0m\]"
  case $TERM in
    xterm*|rxvt*)
      TITLEBAR='\[\033]0;\u@\h:\w\007\]'
      ;;
    *)
      TITLEBAR=""
      ;;
  esac
  PS1="\u@\h [\t]> "
  PS1="${TITLEBAR}\
  $BLUE\u@\h $RED[\t]>$NO_COLOR "
  PS2='continue-> '
  PS4='$0.$LINENO+ '
}
You can re-login for the changes to take effect or source the .bash_profile as shown below.
$. ./.bash_profile
$ prompt

user@hostname [13:02:13]>

7. Change the prompt color using tput

You can also change color of the PS1 prompt using tput as shown below:
$ export PS1="\[$(tput bold)$(tput setb 4)$(tput setaf 7)\]\u@\h:\w $ \[$(tput sgr0)\]"
tput Color Capabilities:
  • tput setab [1-7] – Set a background color using ANSI escape
  • tput setb [1-7] – Set a background color
  • tput setaf [1-7] – Set a foreground color using ANSI escape
  • tput setf [1-7] – Set a foreground color
tput Text Mode Capabilities:
  • tput bold – Set bold mode
  • tput dim – turn on half-bright mode
  • tput smul – begin underline mode
  • tput rmul – exit underline mode
  • tput rev – Turn on reverse mode
  • tput smso – Enter standout mode (bold on rxvt)
  • tput rmso – Exit standout mode
  • tput sgr0 – Turn off all attributes
Color Code for tput:
  • 0 – Black
  • 1 – Red
  • 2 – Green
  • 3 – Yellow
  • 4 – Blue
  • 5 – Magenta
  • 6 – Cyan
  • 7 – White

8. Create your own prompt using the available codes for PS1 variable

Use the following codes and create your own personal PS1 Linux prompt that is functional and suites your taste. Which code from this list will be very helpful for daily use? Leave your comment and let me know what PS1 code you’ve used for your Linux prompt.
  • \a an ASCII bell character (07)
  • \d the date in “Weekday Month Date” format (e.g., “Tue May 26″)
  • \D{format} – the format is passed to strftime(3) and the result is inserted into the prompt string; an empty format results in a locale-specific time representation. The braces are required
  • \e an ASCII escape character (033)
  • \h the hostname up to the first part
  • \H the hostname
  • \j the number of jobs currently managed by the shell
  • \l the basename of the shell’s terminal device name
  • \n newline
  • \r carriage return
  • \s the name of the shell, the basename of $0 (the portion following the final slash)
  • \t the current time in 24-hour HH:MM:SS format
  • \T the current time in 12-hour HH:MM:SS format
  • \@ the current time in 12-hour am/pm format
  • \A the current time in 24-hour HH:MM format
  • \u the username of the current user
  • \v the version of bash (e.g., 2.00)
  • \V the release of bash, version + patch level (e.g., 2.00.0)
  • \w the current working directory, with $HOME abbreviated with a tilde
  • \W the basename of the current working directory, with $HOME abbreviated with a tilde
  • \! the history number of this command
  • \# the command number of this command
  • \$ if the effective UID is 0, a #, otherwise a $
  • \nnn the character corresponding to the octal number nnn
  • \\ a backslash
  • \[ begin a sequence of non-printing characters, which could be used to embed a terminal control sequence into the prompt
  • \] end a sequence of non-printing character

9. Use bash shell function inside PS1 variable

You can also invoke a bash shell function in the PS1 as shown below.
user@hostname ~> function httpdcount {
>  ps aux | grep httpd | grep -v grep | wc -l
> }

user@hostname ~> export PS1="\u@\h [`httpdcount`]> "

user@hostname [12]> [Note: This displays the total number of running httpd processes]

You can add the following line to .bash_profile or .bashrc to make this change permanent:
function httpdcount {
  ps aux | grep httpd | grep -v grep | wc -l
}
export PS1='\u@\h [`httpdcount`]> '

10. Use shell script inside PS1 variable

You can also invoke a shell script inside the PS1 variable. In the example below, the ~/bin/totalfilesize.sh, which calculates the total filesize of the current directory, is invoked inside the PS1 variable.

user@hostname  ~> cat ~/bin/totalfilesize.sh

for filesize in $(ls -l . | grep "^-" | awk '{print $5}')
do
  let totalsize=$totalsize+$filesize
done
echo -n "$totalsize"

user@hostname  ~> export PATH=$PATH:~/bin
user@hostname ~> export PS1="\u@\h [\$(totalfilesize.sh) bytes]> "
user@hostname [534 bytes]> cd /etc/mail

user@hostname [167997 bytes]> [Note: This executes the totalfilesize.sh to display the total file size of the current directory in the PS1 prompt]

Friday, October 16, 2015

How to Increase the size of a Linux LVM by expanding the virtual machine disk

This post will cover how to increase the disk space for a VMware virtual machine running Linux that is using logical volume manager (LVM). Firstly we will be increasing the size of the actual disk on the VMware virtual machine, so at the hardware level – this is the VM’s .vmdk file. Once this is complete we will get into the virtual machine and make the necessary changes through the operating system in order to take advantage of the additional space that has been provided by the hard drive being extended. This will involve creating a new partition with the new space, expanding the volume group and logical group, then finally resizing the file system.

Throughout my examples I will be working with a VMware virtual machine running Red Hat 6, this was set up with a 20gb disk and we will be increasing it by 10gb for a total final size of 30gb.

Identifying the partition type

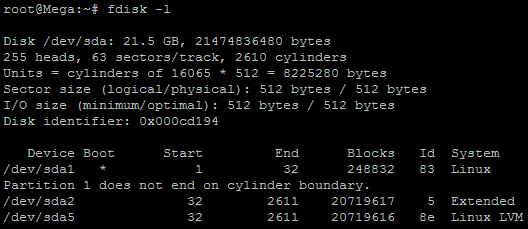
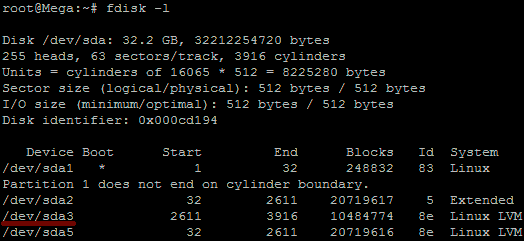
As this method focuses on working with LVM, we will first confirm that our partition type is actually Linux LVM by running the below command.
fdisk -l

fdisk
As you can see in the above image /dev/sda5 is listed as “Linux LVM” and it has the ID of 8e. The 8e hex code shows that it is a Linux LVM, while 83 shows a Linux native partition. Now that we have confirmed we are working with an LVM we can continue. For increasing the size of a Linux native partition (hex code 83).

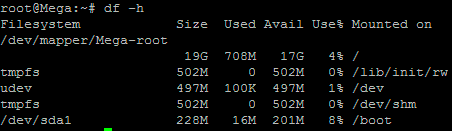
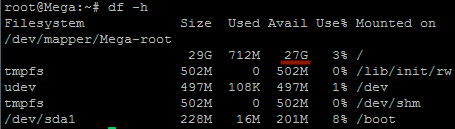
Below is the disk information showing that our initial setup only has the one 20gb disk currently, which is under the logical volume named /dev/mapper/Mega-root – this is what we will be expanding with the new disk.

disk free

Note that /dev/mapper/Mega-root is the volume made up from /dev/sda5 currently – this is what we will be expanding.


Increasing the virtual hard disk

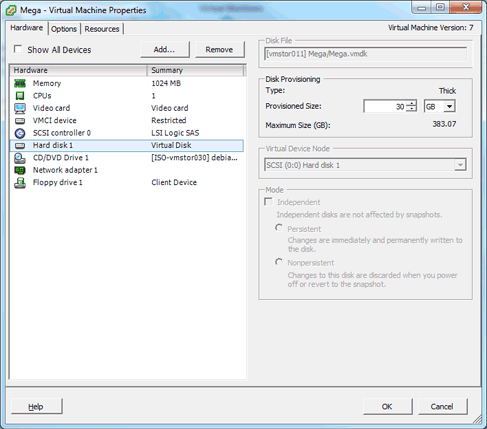
First off we increase the allocated disk space on the virtual machine itself. This is done by right clicking the virtual machine in vSphere, selecting edit settings, and then selecting the hard disk. In the below image I have changed the previously set hard disk of 20gb to 30gb while the virtual machine is up and running. Once complete click OK, this is all that needs to be done in VMware for this process.

vSphere settings

If you are not able to modify the size of the disk, the provisioned size setting is greyed out. This can happen if the virtual machine has a snapshot in place, these will need to be removed prior to making the changes to the disk. Alternatively you may need to shut down the virtual machine if it does not allow you to add or increase disks on the fly, if this is the case make the change then power it back on.


Detect the new disk space

Once the physical disk has been increased at the hardware level, we need to get into the operating system and create a new partition that makes use of this space to proceed.

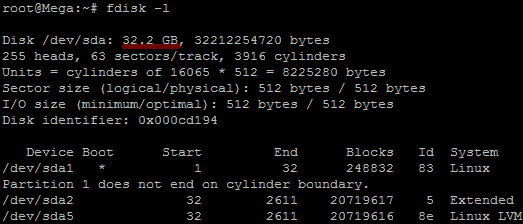
Before we can do this we need to check that the new unallocated disk space is detected by the server, you can use “fdisk -l” to list the primary disk. You will most likely see that the disk space is still showing as the same original size, at this point you can either reboot the server and it will detect the changes on boot or you can rescan your devices to avoid rebooting by running the below command.

Note you may need to change host0 depending on your setup.
echo "- - -" > /sys/class/scsi_host/host0/scan

Below is an image after performing this and confirming that the new space is displaying.

fdisk


Partition the new disk space

As outlined in my previous images the disk in my example that I am working with is /dev/sda, so we use fdisk to create a new primary partition to make use of the new expanded disk space. Note that we do not have 4 primary partitions already in place, making this method possible.
fdisk /dev/sda

We are now using fdisk to create a new partition, the inputs I have entered in are shown below in bold. Note that you can press ‘m’ to get a full listing of the fdisk commands.
‘n’ was selected for adding a new partition.

WARNING: DOS-compatible mode is deprecated. It's strongly recommended to
         switch off the mode (command 'c') and change display units to
         sectors (command 'u').

Command (m for help): n
‘p’ is then selected as we are making a primary partition.
Command action
   l   logical (5 or over)
   p   primary partition (1-4)
p

As I already have /dev/sda1 and /dev/sda2 as shown in previous images, I have gone with using ‘3’ for this new partition which will be created as /dev/sda3
Partition number (1-4): 3

We just press enter twice above as by default the first and last cylinders of the unallocated space should be correct. After this the partition is then ready.

First cylinder (2611-3916, default 2611): "enter"
Using default value 2611
Last cylinder, +cylinders or +size{K,M,G} (2611-3916, default 3916): "enter"
Using default value 3916
‘t’ is selected to change to a partition’s system ID, in this case we change to ‘3’ which is the one we just created.
Command (m for help): t
Partition number (1-5): 3

The hex code ‘8e’ was entered as this is the code for a Linux LVM which is what we want this partition to be, as we will be joining it with the original /dev/sda5 Linux LVM.
Hex code (type L to list codes): 8e
Changed system type of partition 3 to 8e (Linux LVM)

‘w’ is used to write the table to disk and exit, basically all the changes that have been done will be saved and then you will be exited from fdisk.
Command (m for help): w
The partition table has been altered!

Calling ioctl() to re-read partition table.

WARNING: Re-reading the partition table failed with error 16: Device or resource busy.
The kernel still uses the old table. The new table will be used at
the next reboot or after you run partprobe(8) or kpartx(8)
Syncing disks.

You will see a warning which basically means in order to use the new table with the changes a system reboot is required. If you can not see the new partition using “fdisk -l” you may be able to run “partprobe -s” to rescan the partitions. In my test I did not require either of those things at this stage (I do a reboot later on), straight after pressing ‘w’ in fdisk I was able to see the new /dev/sda3 partition of my 10gb of space as displayed in the below image.

For CentOS/RHEL run a “partx -a /dev/sda3” to avoid rebooting later on.

fdisk
That’s all for partitioning, we now have a new partition which is making use of the previously unallocated disk space from the increase in VMware.


Increasing the logical volume

We use the pvcreate command which creates a physical volume for later use by the logical volume manager (LVM). In this case the physical volume will be our new /dev/sda3 partition.
root@Mega:~# pvcreate /dev/sda3
  Device /dev/sda3 not found (or ignored by filtering).

In order to get around this you can either reboot, or use partprobe/partx as previously mentioned to avoid a reboot, as in this instance the disk does not appear to be there correctly despite showing in “fdisk -l”. After a reboot or partprobe/partx use the same command which will succeed.
root@Mega:~# pvcreate /dev/sda3
  Physical volume "/dev/sda3" successfully created

Next we need to confirm the name of the current volume group using the vgdisplay command. The name will vary depending on your setup, for me it is the name of my test server. vgdisplay provides lots of information on the volume group, I have only shown the name and the current size of it for this example.

root@Mega:~# vgdisplay
  --- Volume group ---
  VG Name               Mega
...
VG Size               19.76 GiB

Now we extend the ‘Mega’ volume group by adding in the physical volume of /dev/sda3 which we created using the pvcreate command earlier.
root@Mega:~# vgextend Mega /dev/sda3
  Volume group "Mega" successfully extended

Using the pvscan command we scan all disks for physical volumes, this should confirm the original /dev/sda5 partition and the newly created physical volume /dev/sda3
root@Mega:~# pvscan
  PV /dev/sda5   VG Mega   lvm2 [19.76 GiB / 0    free]
  PV /dev/sda3   VG Mega   lvm2 [10.00 GiB / 10.00 GiB free]
  Total: 2 [29.75 GiB] / in use: 2 [29.75 GiB] / in no VG: 0 [0   ]

Next we need to increase the logical volume (rather than the physical volume) which basically means we will be taking our original logical volume and extending it over our new partition/physical volume of /dev/sda3.

Firstly confirm the name of the logical volume using lvdisplay. This name will vary depending on your setup.

root@Mega:~# lvdisplay
  --- Logical volume ---
  LV Name                /dev/Mega/root
The logical volume is then extended using the lvextend command.
root@Mega:~# lvextend /dev/Mega/root /dev/sda3
  Extending logical volume root to 28.90 GiB
  Logical volume root successfully resized

There is then one final step which is to resize the file system so that it can take advantage of this additional space, this is done using the resize2fs command for ext based file systems. Note that this may take some time to complete, it took about 30 seconds for my additional space.

root@Mega:~# resize2fs /dev/Mega/root
resize2fs 1.41.12 (17-May-2010)
Filesystem at /dev/Mega/root is mounted on /; on-line resizing required
old desc_blocks = 2, new_desc_blocks = 2
Performing an on-line resize of /dev/Mega/root to 7576576 (4k) blocks.
The filesystem on /dev/Mega/root is now 7576576 blocks long.

Alternatively if you’re running the XFS file system (default as of RedHat/CentOS 7) you can grow the file system with “xfs_growfs /dev/Mega/root”.

That’s it, now with the ‘df’ command we can see that the total available disk space has been increased.
disk free after expansion

Thursday, October 15, 2015

What does 2>/dev/null mean and 2>&1…?

What does this command actually do?

~]# grep -i 'abc' content 2>/dev/null

The > operator redirects the output usually to a file but it can be to a device. You can also use >> to append.
If you don't specify a number then the standard output stream is assumed but you can also redirect errors
> file redirects stdout to file
1> file redirects stdout to file
2> file redirects stderr to file
&> file redirects stdout and stderr to file
/dev/null is the null device it takes any input you want and throws it away. It can be used to suppress any output.


~]# ./executable_script.sh | tee 2>&1 /tmp/filename.log

Allows you to execute a script and view all errors on the console and output to  a log file for viewing afterwards. This helps to view any errors that scroll past your the console screen to fast.

How to Password Protect GRUB

STEP 1: Create a password for GRUB, be a root user and open command prompt, type below command. When prompted type grub password twice and press enter. This will return MD5 hash password. Please copy or note it down.
[root@tecmint ~]#  grub-md5-crypt
Sample Output:
[root@tecmint ~]# grub-md5-crypt
Password: 
Retype password: 
$1$19oD/1$NklcucLPshZVoo5LvUYEp1


Step 2: Now you need to open the /boot/grub/menu.lst or /boot/grub/grub.conf file and add the MD5 password. Both files are same and symbolic link to each other.
[root@tecmint ~]# vi /boot/grub/menu.lst

OR

[root@tecmint ~]# vi /boot/grub/grub.conf
Note : I advise you to take backup of the files before making any changes to it, if in case something goes wrong you can revert it.


STEP 3: Add the newly created MD5 password in GRUB configuration file. Please paste copied password below timeout line and save it and exit. For example, Enter the line password –md5 <add the copied md5 string from step 1> above.

# grub.conf generated by anaconda
#
# Note that you do not have to rerun grub after making changes to this file
# NOTICE:  You have a /boot partition.  This means that
#          all kernel and initrd paths are relative to /boot/, eg.
#          root (hd0,0)
#          kernel /vmlinuz-version ro root=/dev/sda3
#          initrd /initrd-[generic-]version.img
#boot=/dev/sda
default=0
timeout=5
password --md5 $1$TNUb/1$TwroGJn4eCd4xsYeGiBYq.
splashimage=(hd0,0)/grub/splash.xpm.gz
hiddenmenu
title CentOS (2.6.32-279.5.2.el6.i686)
        root (hd0,0)
        kernel /vmlinuz-2.6.32-279.5.2.el6.i686 ro root=UUID=d06b9517-8bb3-44db-b8c5-7710e183edb7 rd_NO_LUKS rd_NO_LVM rd_NO_MD rd_NO_DM LANG=en_US.UTF-8 SYSFONT=latarcyrheb-sun16 KEYBOARDTYPE=pc KEYTABLE=us crashkernel=auto rhgb quiet
        initrd /initramfs-2.6.32-279.5.2.el6.i686.img
title centos (2.6.32-71.el6.i686)
        root (hd0,0)
        kernel /vmlinuz-2.6.32-71.el6.i686 ro root=UUID=d06b9517-8bb3-44db-b8c5-7710e183edb7 rd_NO_LUKS rd_NO_LVM rd_NO_MD rd_NO_DM LANG=en_US.UTF-8 SYSFONT=latarcyrheb-sun16 KEYBOARDTYPE=pc KEYTABLE=us crashkernel=auto rhgb quiet
        initrd /initramfs-2.6.32-71.el6.i686.img

STEP 4: Reboot system and try it pressing ‘p‘ to enter password to unlock and enable next features.

Thursday, August 13, 2015

Solaris 10 - `host` and `nslookup` resolves hostnames while `ping` and `telnet` does not?

  • /etc/resolv.conf contains a nameserver that is alive (as reported by the ping command)
  • host or nslookup is able to resolve google.com

    $ host google.com
    google.com has address 74.125.228.3
    google.com has address 74.125.228.4
    ...
    $ nslookup google.com
    ...
    Non-authorative answer:
    Name:   google.com
    Address: 74.125.228.0
    Name:   google.com
    Address: 74.125.228.1
    ..
     
  • ping or telnet is not able to resolve google.com

    $ ping google.com
    ping: unknown host google.com
    
    $ telnet google.com
    google.com: node name or service name not known
     
     
    Fix Solution:
     
    Your /etc/nsswitch.conf should have an entry like this:
    
    hosts:  files dns


    This tells the Solaris Naming Service that hosts should be looked up first in the local file (i.e. /etc/hosts) and then in DNS. You can of course also only have "dns" here but people will normally want it so that /etc/hosts can override what is in DNS.

    You may now have to restart the naming service daemon:
    $svcadm restart /system/name-service-cache
     

Solaris 10 - Configure a Physical Ethernet Interface After System Installation

  1. On the system with the interfaces to be configured, assume the Primary Administrator role or become superuser.
    The Primary Administrator role includes the Primary Administrator profile. To create the role and assign the role to a user, see Chapter 2, Working With the Solaris Management Console (Tasks), in System Administration Guide: Basic Administration.
  2. Determine which interfaces are currently installed on the system.

    # dladm show-link  
  3.  Configure and plumb each interface.

    # ifconfig interface plumb up
    

    For example, for qfe0 you would type:

    # ifconfig qfe0 plumb up
    

    Note: Interfaces that are explicitly configured with the ifconfig command do not persist across a reboot.

  4. Assign an IPv4 address and netmask to the interface.

    # ifconfig interface IPv4-address netmask+netmask
    
    For example, for qfe0 you would type:

    # ifconfig
    qfe0 192.168.84.3 netmask + 255.255.255.0
    

    Note: You can specify an IPv4 address in either traditional IPv4 notation or CIDR notation.

  5. Verify that the newly configured interfaces are plumbed and configured, or “UP.”

    # ifconfig
    -a
    
    Check the status line for each interface that is displayed. Ensure that the output contains an UP flag on the status line, for example:

    qfe0: flags=1000843 <UP,BROADCAST,RUNNING,MULTICAST,IPv4>
    mtu 1500 index 2
  6. (Optional) To make the interface configuration persist across reboots, perform the following steps:
    1. Create an /etc/hostname.interface file for each interface to be configured.
      For example, to add a qfe0 interface, you would create the following file:

      # vi /etc/hostname.qfe0
      

      Note – If you create alternate hostname files for the same interface, the alternate files must also follow the naming format hostname.[0–9]*, such as hostname.qfe0.a123. Names such as hostname.qfe0.bak or hostname.qfe0.old are invalid and will be ignored by scripts during system boot.
      Note, too, that a given interface must have only one corresponding hostname file. If you create an alternate hostname file for an interface with a valid filename, such as /etc/hostname.qfe and /etc/hostname.qfe.a123, the boot scripts will attempt to configure by referencing the contents of both hostname files and would therefore generate errors. To prevent these errors, provide an invalid file name to the hostname file that you do not want to use in a given configuration.

    2. Edit the /etc/hostname.interface file.
      At a minimum, add the IPv4 address of the interface to the file. You can use traditional IPv4 notation or CIDR notation to specify the IP address of the interface. You can also add a netmask and other configuration information to the file.

      Note – To add an IPv6 address to an interface, refer to Modifying an IPv6 Interface Configuration for Hosts and Servers

    3. For Solaris 10 11/06 and earlier releases of Oracle Solaris 10, add entries for the new interfaces into the /etc/inet/ipnodes file.
    4. Add entries for the new interfaces into the /etc/inet/hosts file.
    5. Perform a reconfiguration boot.

      # reboot -- -r
      
    6. Verify that the interface you created in the /etc/hostname.interface file has been configured.

      # ifconfig -a
      
      For examples, refer to Example 6–2.

Example 6–2 Adding Persistent Interface Configurations
The example shows how to configure the interfaces qfe0 and qfe1 to a host. These interfaces remain persistent across reboots.


# dladm show-link
eri0    type: legacy    mtu: 1500       device: eri0 
qfe0    type: legacy    mtu: 1500       device: qfe0 
qfe1    type: legacy    mtu: 1500       device: qfe1 
qfe2    type: legacy    mtu: 1500       device: qfe2 
qfe3    type: legacy    mtu: 1500       device: qfe3 
bge0    type: non-vlan  mtu: 1500       device: bge0
# vi /etc/hostname.qfe0
192.168.84.3 netmask 255.255.255.0
# vi /etc/hostname.qfe1 
192.168.84.72 netmask 255.255.255.0
# vi /etc/inet/hosts
# Internet host table 
# 
127.0.0.1       localhost 
10.0.0.14       myhost
192.168.84.3       interface-2 
192.168.84.72       interface-3
For Solaris 10 11/06 and earlier releases:# vi /etc/inet/ipnodes
10.0.0.14 myhost
192.168.84.3       interface-2 
192.168.84.72       interface-3

At this point, you would reboot the system.

# reboot -- -r

After the system boots, you would then verify the interface configuration.

ifconfig -a
# ifconfig -a lo0: flags=1000849 <UP,LOOPBACK,RUNNING,MULTICAST,IPv4> mtu
8232 index 1
         inet 127.0.0.1 netmask ff000000  
eri0: flags=1000843<UP,BROADCAST,RUNNING,MULTICAST,IPv4> mtu 1500 index 2
         inet 10.0.0.14netmask ff000000 broadcast 10.255.255.255
         ether 8:0:20:c1:8b:c3  
qfe0:flags=1000843 <UP,BROADCAST,RUNNING,MULTICAST,IPv4> mtu 1500 index 3  
      inet 192.168.84.3 netmask ffffff00 broadcast 192.255.255.255
      ether 8:0:20:c8:f4:1d  
qfe1: flags=1000843 <UP,BROADCAST,RUNNING,MULTICAST,IPv4>mtu 1500 index 4
         inet 192.168.84.72 netmask ffffff00 broadcast 10.255.255.255
        ether 8:0:20:c8:f4:1e 

Tuesday, August 11, 2015

Install Firefox 39 on CentOS, Ubuntu & Other Linux Systems

Remove Existing Version’s

First remove any existing version of Firefox from your system if installed using rpm. Redhat based system use following command.
# yum remove firefox

Downloading Latest Firefox Archive

Download the latest Firefox archive from here (32 bit) and here (64 bit). At the time of last update of this article Firefox 39 is the latest version available. Download Firefox 39 source code as per your system architecture using one of following commands.

32-Bit Systems

# cd /usr/local
# wget http://ftp.mozilla.org/pub/mozilla.org/firefox/releases/39.0/linux-i686/en-US/firefox-39.0.tar.bz2

64-Bit Systems

# cd /usr/local
# wget http://ftp.mozilla.org/pub/mozilla.org/firefox/releases/39.0/linux-x86_64/en-US/firefox-39.0.tar.bz2

Extract Archive on System

After downloading latest version of Firefox archive on your system, let’s extract is using following command.
# tar xvjf firefox-39.0.tar.bz2

Configure Firefox

Firefox source is completely pre compiled and we don’t have to do anything to make it running on system. We just need to create a soft-link of Firefox binary file to systems bin directory to make it accessible from anywhere in system.
# ln -s /usr/local/firefox/firefox /usr/bin/firefox

Now start Firefox using following command from Linux terminal.
# firefox &

Wednesday, August 5, 2015

TAR Commands,examples for Linux

1. Create tar Archive File

The below example command will create a tar archive file tecmint-14-09-12.tar for a directory /home/tecmint in current working directory. See the example command in action.
# tar -cvf tecmint-14-09-12.tar /home/tecmint/

/home/tecmint/
/home/tecmint/cleanfiles.sh
/home/tecmint/openvpn-2.1.4.tar.gz
/home/tecmint/tecmint-14-09-12.tar
/home/tecmint/phpmyadmin-2.11.11.3-1.el5.rf.noarch.rpm
/home/tecmint/rpmforge-release-0.5.2-2.el5.rf.i386.rpm
Let’s discuss the each option we have used in the above command for creating tar archive file.
  1. c – Creates a new .tar archive file.
  2. v – Verbosely show the .tar file progress.
  3. f – File name type of the archive file.

2. Create tar.gz Archive File

To create a compressed gzip archive file we use the option as z. For example the below command will create a compressed MyImages-14-09-12.tar.gz file for the directory /home/MyImages. (Note : tar.gz and tgz both are similar).
# tar cvzf MyImages-14-09-12.tar.gz /home/MyImages
OR
# tar cvzf MyImages-14-09-12.tgz /home/MyImages

/home/MyImages/
/home/MyImages/Sara-Khan-and-model-Priyanka-Shah.jpg
/home/MyImages/RobertKristenviolent101201.jpg
/home/MyImages/Justintimerlake101125.jpg
/home/MyImages/Mileyphoto101203.jpg
/home/MyImages/JenniferRobert101130.jpg
/home/MyImages/katrinabarbiedoll231110.jpg
/home/MyImages/the-japanese-wife-press-conference.jpg
/home/MyImages/ReesewitherspoonCIA101202.jpg
/home/MyImages/yanaguptabaresf231110.jpg

3. Create tar.bz2 Archive File

The bz2 feature compress and create archive file less than the size of the gzip. The bz2 compression takes more time to compress and decompress files as compared to gzip which takes less time. To create highly compressed tar file we use option as j. The following example of command will create a Phpfiles-org.tar.bz2 file for a directory /home/php. (Note: tar.bz2 and tbz is similar as tb2).
# tar cvfj Phpfiles-org.tar.bz2 /home/php
OR
# tar cvfj Phpfiles-org.tar.tbz /home/php
OR 
# tar cvfj Phpfiles-org.tar.tb2 /home/php

/home/php/
/home/php/iframe_ew.php
/home/php/videos_all.php
/home/php/rss.php
/home/php/index.php
/home/php/vendor.php
/home/php/video_title.php
/home/php/report.php
/home/php/object.html
/home/php/video.php

4. Untar tar Archive File

To untar or extract a tar file, just issue following command using option x (extract). For example the below command will untar the file public_html-14-09-12.tar in present working directory. If you want untar in a different directory then use option as -C (specified directory).
## Untar files in Current Directory ##
# tar -xvf public_html-14-09-12.tar

## Untar files in specified Directory ##
# tar -xvf public_html-14-09-12.tar -C /home/public_html/videos/

/home/public_html/videos/
/home/public_html/videos/views.php
/home/public_html/videos/index.php
/home/public_html/videos/logout.php
/home/public_html/videos/all_categories.php
/home/public_html/videos/feeds.xml

5. Uncompress tar.gz Archive File

To Uncompress tar.gz archive file, just run following command. If would like to untar in different directory just use option -C and the path of the directory,  like we shown in the above example.
# tar -xvf thumbnails-14-09-12.tar.gz

/home/public_html/videos/thumbnails/
/home/public_html/videos/thumbnails/katdeepika231110.jpg
/home/public_html/videos/thumbnails/katrinabarbiedoll231110.jpg
/home/public_html/videos/thumbnails/onceuponatime101125.jpg
/home/public_html/videos/thumbnails/playbutton.png
/home/public_html/videos/thumbnails/ReesewitherspoonCIA101202.jpg
/home/public_html/videos/thumbnails/snagItNarration.jpg
/home/public_html/videos/thumbnails/Minissha-Lamba.jpg
/home/public_html/videos/thumbnails/Lindsaydance101201.jpg
/home/public_html/videos/thumbnails/Mileyphoto101203.jpg

6. Uncompress tar.bz2 Archive File

To Uncompress highly compressed tar.bz2 file, just use the following command. The below example command will untar all the .flv files from the archive file.
# tar -xvf videos-14-09-12.tar.bz2

/home/public_html/videos/flv/katrinabarbiedoll231110.flv
/home/public_html/videos/flv/BrookmuellerCIA101125.flv
/home/public_html/videos/flv/dollybackinbb4101125.flv
/home/public_html/videos/flv/JenniferRobert101130.flv
/home/public_html/videos/flv/JustinAwardmovie101125.flv
/home/public_html/videos/flv/Lakme-Fashion-Week.flv
/home/public_html/videos/flv/Mileyphoto101203.flv
/home/public_html/videos/flv/Minissha-Lamba.flv

7. List Content of tar Archive File

To list the content of tar archive file, just run the following command with option t (list content). The below command will list the content of uploadprogress.tar file.
# tar -tvf uploadprogress.tar

-rw-r--r-- chregu/staff   2276 2011-08-15 18:51:10 package2.xml
-rw-r--r-- chregu/staff   7877 2011-08-15 18:51:10 uploadprogress/examples/index.php
-rw-r--r-- chregu/staff   1685 2011-08-15 18:51:10 uploadprogress/examples/server.php
-rw-r--r-- chregu/staff   1697 2011-08-15 18:51:10 uploadprogress/examples/info.php
-rw-r--r-- chregu/staff    367 2011-08-15 18:51:10 uploadprogress/config.m4
-rw-r--r-- chregu/staff    303 2011-08-15 18:51:10 uploadprogress/config.w32
-rw-r--r-- chregu/staff   3563 2011-08-15 18:51:10 uploadprogress/php_uploadprogress.h
-rw-r--r-- chregu/staff  15433 2011-08-15 18:51:10 uploadprogress/uploadprogress.c
-rw-r--r-- chregu/staff   1433 2011-08-15 18:51:10 package.xml

8. List Content tar.gz Archive File

Use the following command to list the content of tar.gz file.
# tar -tvf staging.tecmint.com.tar.gz

-rw-r--r-- root/root         0 2012-08-30 04:03:57 staging.tecmint.com-access_log
-rw-r--r-- root/root       587 2012-08-29 18:35:12 staging.tecmint.com-access_log.1
-rw-r--r-- root/root       156 2012-01-21 07:17:56 staging.tecmint.com-access_log.2
-rw-r--r-- root/root       156 2011-12-21 11:30:56 staging.tecmint.com-access_log.3
-rw-r--r-- root/root       156 2011-11-20 17:28:24 staging.tecmint.com-access_log.4
-rw-r--r-- root/root         0 2012-08-30 04:03:57 staging.tecmint.com-error_log
-rw-r--r-- root/root      3981 2012-08-29 18:35:12 staging.tecmint.com-error_log.1
-rw-r--r-- root/root       211 2012-01-21 07:17:56 staging.tecmint.com-error_log.2
-rw-r--r-- root/root       211 2011-12-21 11:30:56 staging.tecmint.com-error_log.3
-rw-r--r-- root/root       211 2011-11-20 17:28:24 staging.tecmint.com-error_log.4

9. List Content tar.bz2 Archive File

To list the content of tar.bz2 file, issue the following command.
# tar -tvf Phpfiles-org.tar.bz2

drwxr-xr-x root/root         0 2012-09-15 03:06:08 /home/php/
-rw-r--r-- root/root      1751 2012-09-15 03:06:08 /home/php/iframe_ew.php
-rw-r--r-- root/root     11220 2012-09-15 03:06:08 /home/php/videos_all.php
-rw-r--r-- root/root      2152 2012-09-15 03:06:08 /home/php/rss.php
-rw-r--r-- root/root      3021 2012-09-15 03:06:08 /home/php/index.php
-rw-r--r-- root/root      2554 2012-09-15 03:06:08 /home/php/vendor.php
-rw-r--r-- root/root       406 2012-09-15 03:06:08 /home/php/video_title.php
-rw-r--r-- root/root      4116 2012-09-15 03:06:08 /home/php/report.php
-rw-r--r-- root/root      1273 2012-09-15 03:06:08 /home/php/object.html

10. Untar Single file from tar File

To extract a single file called cleanfiles.sh from cleanfiles.sh.tar use the following command.
# tar -xvf cleanfiles.sh.tar cleanfiles.sh
OR
# tar --extract --file=cleanfiles.sh.tar cleanfiles.sh

cleanfiles.sh

11. Untar Single file from tar.gz File

To extract a single file tecmintbackup.xml from tecmintbackup.tar.gz archive file, use the command as follows.
# tar -zxvf tecmintbackup.tar.gz tecmintbackup.xml
OR
# tar --extract --file=tecmintbackup.tar.gz tecmintbackup.xml

tecmintbackup.xml

12. Untar Single file from tar.bz2 File

To extract a single file called index.php from the file Phpfiles-org.tar.bz2 use the following option.
# tar -jxvf Phpfiles-org.tar.bz2 home/php/index.php
OR
# tar --extract --file=Phpfiles-org.tar.bz2 /home/php/index.php

/home/php/index.php

13. Untar Multiple files from tar, tar.gz and tar.bz2 File

To extract or untar multiple files from the tar, tar.gz and tar.bz2 archive file. For example the below command will extract “file 1” “file 2” from the archive files.
# tar -xvf tecmint-14-09-12.tar "file 1" "file 2" 

# tar -zxvf MyImages-14-09-12.tar.gz "file 1" "file 2" 

# tar -jxvf Phpfiles-org.tar.bz2 "file 1" "file 2"

14. Extract Group of Files using Wildcard

To extract a group of files we use wildcard based extracting. For example, to extract a group of all files whose pattern begins with .php from a tar, tar.gz and tar.bz2 archive file.
# tar -xvf Phpfiles-org.tar --wildcards '*.php'

# tar -zxvf Phpfiles-org.tar.gz --wildcards '*.php'

# tar -jxvf Phpfiles-org.tar.bz2 --wildcards '*.php'

/home/php/iframe_ew.php
/home/php/videos_all.php
/home/php/rss.php
/home/php/index.php
/home/php/vendor.php
/home/php/video_title.php
/home/php/report.php
/home/php/video.php

15. Add Files or Directories to tar Archive File

To add files or directories to existing tar archived file we use the option r (append). For example we add file xyz.txt and directory php to existing tecmint-14-09-12.tar archive file.
# tar -rvf tecmint-14-09-12.tar xyz.txt

# tar -rvf tecmint-14-09-12.tar php

drwxr-xr-x root/root         0 2012-09-15 02:24:21 home/tecmint/
-rw-r--r-- root/root  15740615 2012-09-15 02:23:42 home/tecmint/cleanfiles.sh
-rw-r--r-- root/root    863726 2012-09-15 02:23:41 home/tecmint/openvpn-2.1.4.tar.gz
-rw-r--r-- root/root  21063680 2012-09-15 02:24:21 home/tecmint/tecmint-14-09-12.tar
-rw-r--r-- root/root   4437600 2012-09-15 02:23:41 home/tecmint/phpmyadmin-2.11.11.3-1.el5.rf.noarch.rpm
-rw-r--r-- root/root     12680 2012-09-15 02:23:41 home/tecmint/rpmforge-release-0.5.2-2.el5.rf.i386.rpm
-rw-r--r-- root/root 0 2012-08-18 19:11:04 xyz.txt
drwxr-xr-x root/root 0 2012-09-15 03:06:08 php/ 
-rw-r--r-- root/root 1751 2012-09-15 03:06:08 php/iframe_ew.php 
-rw-r--r-- root/root 11220 2012-09-15 03:06:08 php/videos_all.php 
-rw-r--r-- root/root 2152 2012-09-15 03:06:08 php/rss.php 
-rw-r--r-- root/root 3021 2012-09-15 03:06:08 php/index.php 
-rw-r--r-- root/root 2554 2012-09-15 03:06:08 php/vendor.php 
-rw-r--r-- root/root 406 2012-09-15 03:06:08 php/video_title.php

16. Add Files or Directories to tar.gz and tar.bz2 files

The tar command don’t have a option to add files or directories to a existing compressed tar.gz and tar.bz2 archive file. If we do try will get tbe following error.
# tar -rvf MyImages-14-09-12.tar.gz xyz.txt

# tar -rvf Phpfiles-org.tar.bz2 xyz.txt

tar: This does not look like a tar archive
tar: Skipping to next header
xyz.txt
tar: Error exit delayed from previous errors

17. How To Verify tar, tar.gz and tar.bz2 Archive File

To verfify any tar or compressed archived file we use option as W (verify). To do, just use the following examples of command. (Note : You cannot do verification on a compressed ( *.tar.gz, *.tar.bz2 ) archive file).
# tar tvfW tecmint-14-09-12.tar

tar: This does not look like a tar archive
tar: Skipping to next header
tar: Archive contains obsolescent base-64 headers
tar: VERIFY FAILURE: 30740 invalid headers detected
Verify -rw-r--r-- root/root    863726 2012-09-15 02:23:41 /home/tecmint/openvpn-2.1.4.tar.gz
Verify -rw-r--r-- root/root  21063680 2012-09-15 02:24:21 /home/tecmint/tecmint-14-09-12.tar
tar: /home/tecmint/tecmint-14-09-12.tar: Warning: Cannot stat: No such file or directory
Verify -rw-r--r-- root/root   4437600 2012-09-15 02:23:41 home/tecmint/phpmyadmin-2.11.11.3-1.el5.rf.noarch.rpm
tar: /home/tecmint/phpmyadmin-2.11.11.3-1.el5.rf.noarch.rpm: Warning: Cannot stat: No such file or directory
Verify -rw-r--r-- root/root     12680 2012-09-15 02:23:41 home/tecmint/rpmforge-release-0.5.2-2.el5.rf.i386.rpm
tar: /home/tecmint/rpmforge-release-0.5.2-2.el5.rf.i386.rpm: Warning: Cannot stat: No such file or directory
Verify -rw-r--r-- root/root         0 2012-08-18 19:11:04 xyz.txt
Verify drwxr-xr-x root/root         0 2012-09-15 03:06:08 php/

18. Check the Size of the tar, tar.gz and tar.bz2 Archive File

To check the size of any tar, tar.gz and tar.bz2 archive file, use the following command. For example the below command will display the size of archvie file in Kilobytes (KB).
# tar -czf - tecmint-14-09-12.tar | wc -c
12820480

# tar -czf - MyImages-14-09-12.tar.gz | wc -c
112640

# tar -czf - Phpfiles-org.tar.bz2 | wc -c
20480