Install the latest version of openSCAP (v1.2 at the time of writing:
http://scap.nist.gov/revision/1.2/index.html#xccdf)
#yum install openscap openscap-utils scap-security-guide
# oscap xccdf eval --profile stig-rhel6-server-upstream --results results.xml --report report.html \
--cpe /usr/share/xml/scap/ssg/content/ssg-rhel6-cpe-dictionary.xml \
/usr/share/xml/scap/ssg/content/ssg-rhel6-xccdf.xml
----To remediate some of the findings, use the results.xml file and rerun the scan with the remediate option.------
#oscap xccdf remediate --results results.xml results.xml
--------These are findings that had to be remediated manually.----------------------
## Item: Set Daemon Umask - Failed
# cp -p /etc/init.d/functions{,.preSTIG}
# var_umask_for_daemons="027" \
grep -q ^umask /etc/init.d/functions && \
sed -i "s/umask.*/umask $var_umask_for_daemons/g" /etc/init.d/functions
# if ! [ $? -eq 0 ]; then \
echo "umask $var_umask_for_daemons" >> /etc/init.d/functions \
fi
## Note - still failed in a subsequent scan, so manually modified /etc/init.d/functions and set umask to 027
## Item: Enable ExecShield - Unknown (failed)
# if grep --silent ^kernel.exec-shield /etc/sysctl.conf ; then
sed -i 's/^kernel.exec-shield.*/kernel.exec-shield = 1/g' /etc/sysctl.conf;
else
echo "" >> /etc/sysctl.conf;
echo "# Set kernel.exec-shield to 1 per STIG security requirements" >> /etc/sysctl.conf;
echo "kernel.exec-shield = 1" >> /etc/sysctl.conf;
fi
## Item: Enable Randomized Layout of Virtual Address Space - Unknown (failed)
# if grep --silent ^kernel.randomize_va_space /etc/sysctl.conf ; then
sed -i 's/^kernel.randomize_va_space.*/kernel.randomize_va_space = 2/g' /etc/sysctl.conf
else
echo "" >> /etc/sysctl.conf
echo "# Set kernel.randomize_va_space to 2 per STIG security requirements" >> /etc/sysctl.conf
echo "kernel.randomize_va_space = 2" >> /etc/sysctl.conf
fi
## Item: Ensure No Device Files are Unlabeled by SELinux - Fail (False Positive) Manually verified
# find /dev -context "*:*:unlabeled_t:*" -ls
# or run this command
# find /dev -context *:device_t:* \( -type c -o -type b \) -printf "%p %Z\n"
## Item: Ensure that System Accounts Do Not Run a Shell Upon Login - Failed (exceptions below)
# cat /etc/passwd |grep -v nologin
% The following exceptions are noted
sync:x:5:0:sync:/sbin:/bin/sync [<- appropriate OS shell for this user]
shutdown:x:6:0:shutdown:/sbin:/sbin/shutdown [<- appropriate OS shell for this user]
halt:x:7:0:halt:/sbin:/sbin/halt [<- appropriate OS shell for this user]
postgres:x:26:26:PostgreSQL Server:/var/lib/pgsql:/bin/bash [<- appropriate OS shell for this user]
amandabackup:x:33:6:Amanda user:/var/lib/amanda:/bin/bash [<- appropriate OS shell for this user]
mysql:x:27:27:MySQL Server:/var/lib/mysql:/bin/bash [<- appropriate OS shell for this user]
##Disable xguest account
# vi /etc/passwd
% set shell for xguest user to /sbin/nologin
## Item: Verify All Account Password Hashes are Shadowed - Fail (False Positive) Manually verified
# awk -F: '$2 !~ /^x$/ {print}' /etc/passwd
## Item: All GIDs referenced in /etc/passwd must be defined in /etc/group - notchecked (passed) Manually verified
# awk -F: '{print $4}' /etc/passwd |while read gid
do
getent group $gid > /dev/null || echo "GID: $gid not found - NEEDS FIX"
done
## Alternate check - see if results mention bad or invalid group settings
# pwck -r
# grpck -r
## Item: Ensure All Accounts on the System Have Unique Names - notchecked (passed) Manually verify
# pwck -r
## Item: Assign Expiration Date to Temporary Accounts - notchecked (passed) Manually verify
# awk -F: '$2 !~/[!*]/ {print $1}' /etc/shadow | egrep -v root | while read user
do
echo "User: $user"
chage -l $user; done
done
# date -d "1 year"
# chage -E '2016-10-12' ciadmin
## Item: Set last Logon/Access Notification - fail (passed)
# vi /etc/pam.d/system-auth
# session required pam_lastlog.so showfailed
## Item: Set Password to Maximum of Three Consecutive Repeating Characters - Failed (passed)
# cp -p /etc/pam.d/system-auth-ac{,.preSTIG}
# var_password_pam_maxrepeat="3"
if grep -q "maxrepeat=" /etc/pam.d/system-auth; then
sed -i --follow-symlink "s/\(maxrepeat *= *\).*/\1$var_password_pam_maxrepeat/" /etc/pam.d/system-auth
else
sed -i --follow-symlink "/pam_cracklib.so/ s/$/ maxrepeat=$var_password_pam_maxrepeat/" /etc/pam.d/system-auth
fi
# or manually set "/etc/pam.d/system-auth-ac"
password requisite pam_cracklib.so try_first_pass retry=3 type= maxrepeat=3
## Item: Ensure no world-writable files exist
# find / -perm -2 ! -type l -ls
## Item: Ensure All files are owned by a User - Failed (passes) Manually set user
# find / -nouser
# chown root /"directory or file to set"
## Item: Ensure All files are owned by a Group - Failed (passes) Manually set group
# find / -nogroup
# chgrp root /"directory or file to set"
## Item: Ensure World-Wide directories are owned by a system account
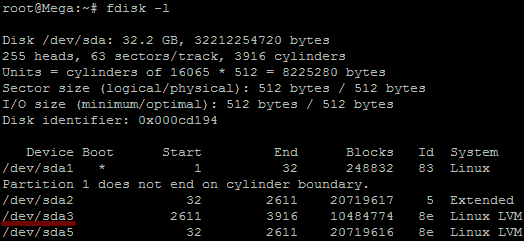
# find (/dev/sda1) -xdev -type d -perm 0002 -uid +500 -print (partition to scan) - Failed (passes) Manually verify
## Item: Set Lockout Time For Failed Password Attempts - CCE-27110-6 - Failed (passed)
## Item: Set Interval For Counting Failed Password Attempts - CCE-27215-3 - Failed (passed)
# cp -p /etc/pam.d/password-auth-ac{,.preSTIG}
# vi /etc/pam.d/password-auth-ac (<- add section for unlock_time and fail_interval)
--
auth required pam_faillock.so preauth silent deny=3 unlock_time=604800 fail_interval=900
auth sufficient pam_unix.so try_first_pass
auth [default=die] pam_faillock.so authfail deny=3 unlock_time=604800 fail_interval=900
--
# vi /etc/pam.d/system-auth-ac (<- add section for unlock_time and fail_interval)
--
auth required pam_faillock.so preauth silent deny=3 unlock_time=604800 fail_interval=900
auth sufficient pam_unix.so try_first_pass
auth [default=die] pam_faillock.so authfail deny=3 unlock_time=604800 fail_interval=900
--
## Item: Set Boot Loader Password - CCE-26911-8 - Failed (passed)
# grub-crypt --sha-512
# Password:(<- use root password here)
# cp -p /etc/grub.conf{,.preSTIG}
# vi /etc/grub.conf
-----modify grub.conf by adding password line-----
default=0
timeout=5
splashimage=(hd0,0)/grub/splash.xpm.gz
hiddenmenu
password --encrypted $6$ZpeyOFUd2tSpcvW9$kK..<hash-stuff-here>...
--
## Item: Disable Ctrl-Alt-Del Reboot Activation - CCE-27567-7 - Failed (passed)
# vi /etc/init/control-alt-delete.conf
--
exec /usr/bin/logger -p security.info "Control-Alt-Delete pressed"
--
## Item: Result for Disable Interactive Boot - CCE-27043-9 - Failed (passed)
# cp -p /etc/sysconfig/init{,.preSTIG}
# grep -q ^PROMPT /etc/sysconfig/init && \
sed -i "s/PROMPT.*/PROMPT=no/g" /etc/sysconfig/init
if ! [ $? -eq 0 ]; then
echo "PROMPT=no" >> /etc/sysconfig/init
fi
## Item: Set GNOME Login Inactivity Timeout - CCE-26828-4 - Unknown (passed)
# inactivity_timeout_value="15"
# gconftool-2 --direct \
--config-source "xml:readwrite:/etc/gconf/gconf.xml.mandatory" \
--type int \
--set /desktop/gnome/session/idle_delay ${inactivity_timeout_value}
## Item: GNOME Desktop Screensaver Mandatory Use - CCE-26600-7 - Unknown (passed)
# gconftool-2 --direct \
--config-source "xml:readwrite:/etc/gconf/gconf.xml.mandatory" \
--type bool \
--set /apps/gnome-screensaver/idle_activation_enabled true
## Item: Enable Screen Lock Activation After Idle Period - CCE-26235-2 - Unknown (passed)
# gconftool-2 --direct \
--config-source "xml:readwrite:/etc/gconf/gconf.xml.mandatory" \
--type bool \
--set /apps/gnome-screensaver/lock_enabled true
## Item: Implement Blank Screensaver - CCE-26638-7 - Unknown (passed)
# gconftool-2 --direct \
--config-source "xml:readwrite:/etc/gconf/gconf.xml.mandatory" \
--type string \
--set /apps/gnome-screensaver/mode blank-only
## Item: Enable Smart Card Login - CCE-27440-7 - Failed (failed)
% Not resolved; no Smart Card readers on system
## Item: Enable GUI Warning Banner - CCE-27195-7 - Unknown (passed)
# gconftool-2 --direct \
--config-source "xml:readwrite:/etc/gconf/gconf.xml.mandatory" \
--type bool \
--set /apps/gdm/simple-greeter/banner_message_enable true
## Item: Set GUI Warning Banner Text - CCE-27017-3 - Unknown (passed)
# login_banner_text="You[\s\n]+are[\s\n]+accessing[\s\n]+a[\s\n]+U.S.[\s\n]+Government[\s\n]+\(USG\)[\s\n]+Information[\s\n]+System[\s\n]+\(IS\)[\s\n]+that[\s\n]+is[\s\n]+provided[\s\n]+for[\s\n]+USG-authorized[\s\n]+use[\s\n]+only.[\s\n]*By[\s\n]+using[\s\n]+this[\s\n]+IS[\s\n]+\(which[\s\n]+includes[\s\n]+any[\s\n]+device[\s\n]+attached[\s\n]+to[\s\n]+this[\s\n]+IS\),[\s\n]+you[\s\n]+consent[\s\n]+to[\s\n]+the[\s\n]+following[\s\n]+conditions\:[\s\n]*-[\s\n]*The[\s\n]+USG[\s\n]+routinely[\s\n]+intercepts[\s\n]+and[\s\n]+monitors[\s\n]+communications[\s\n]+on[\s\n]+this[\s\n]+IS[\s\n]+for[\s\n]+purposes[\s\n]+including,[\s\n]+but[\s\n]+not[\s\n]+limited[\s\n]+to,[\s\n]+penetration[\s\n]+testing,[\s\n]+COMSEC[\s\n]+monitoring,[\s\n]+network[\s\n]+operations[\s\n]+and[\s\n]+defense,[\s\n]+personnel[\s\n]+misconduct[\s\n]+\(PM\),[\s\n]+law[\s\n]+enforcement[\s\n]+\(LE\),[\s\n]+and[\s\n]+counterintelligence[\s\n]+\(CI\)[\s\n]+investigations.[\s\n]*-[\s\n]*At[\s\n]+any[\s\n]+time,[\s\n]+the[\s\n]+USG[\s\n]+may[\s\n]+inspect[\s\n]+and[\s\n]+seize[\s\n]+data[\s\n]+stored[\s\n]+on[\s\n]+this[\s\n]+IS.[\s\n]*-[\s\n]*Communications[\s\n]+using,[\s\n]+or[\s\n]+data[\s\n]+stored[\s\n]+on,[\s\n]+this[\s\n]+IS[\s\n]+are[\s\n]+not[\s\n]+private,[\s\n]+are[\s\n]+subject[\s\n]+to[\s\n]+routine[\s\n]+monitoring,[\s\n]+interception,[\s\n]+and[\s\n]+search,[\s\n]+and[\s\n]+may[\s\n]+be[\s\n]+disclosed[\s\n]+or[\s\n]+used[\s\n]+for[\s\n]+any[\s\n]+USG-authorized[\s\n]+purpose.[\s\n]*-[\s\n]*This[\s\n]+IS[\s\n]+includes[\s\n]+security[\s\n]+measures[\s\n]+\(e.g.,[\s\n]+authentication[\s\n]+and[\s\n]+access[\s\n]+controls\)[\s\n]+to[\s\n]+protect[\s\n]+USG[\s\n]+interests[\s\n]+--[\s\n]+not[\s\n]+for[\s\n]+your[\s\n]+personal[\s\n]+benefit[\s\n]+or[\s\n]+privacy.[\s\n]*-[\s\n]*Notwithstanding[\s\n]+the[\s\n]+above,[\s\n]+using[\s\n]+this[\s\n]+IS[\s\n]+does[\s\n]+not[\s\n]+constitute[\s\n]+consent[\s\n]+to[\s\n]+PM,[\s\n]+LE[\s\n]+or[\s\n]+CI[\s\n]+investigative[\s\n]+searching[\s\n]+or[\s\n]+monitoring[\s\n]+of[\s\n]+the[\s\n]+content[\s\n]+of[\s\n]+privileged[\s\n]+communications,[\s\n]+or[\s\n]+work[\s\n]+product,[\s\n]+related[\s\n]+to[\s\n]+personal[\s\n]+representation[\s\n]+or[\s\n]+services[\s\n]+by[\s\n]+attorneys,[\s\n]+psychotherapists,[\s\n]+or[\s\n]+clergy,[\s\n]+and[\s\n]+their[\s\n]+assistants.[\s\n]+Such[\s\n]+communications[\s\n]+and[\s\n]+work[\s\n]+product[\s\n]+are[\s\n]+private[\s\n]+and[\s\n]+confidential.[\s\n]+See[\s\n]+User[\s\n]+Agreement[\s\n]+for[\s\n]+details."
banner_expanded=$(echo "$login_banner_text" | sed 's/\[\\s\\n\][*+]/ /g;s/\\//g;')
# Set the text shown by the GNOME Display Manager in the login screen
gconftool-2 --direct \
--config-source "xml:readwrite:/etc/gconf/gconf.xml.mandatory" \
--type string \
--set /apps/gdm/simple-greeter/banner_message_text "${banner_expanded}"
## Item: Disable Kernel Parameter for Sending ICMP Redirects by Default - CCE-27001-7 - Unknown (passed)
# if grep --silent ^net.ipv4.conf.default.send_redirects /etc/sysctl.conf ; then
sed -i 's/^net.ipv4.conf.default.send_redirects.*/net.ipv4.conf.default.send_redirects = 0/g' /etc/sysctl.conf
else
echo "" >> /etc/sysctl.conf
echo "# Set net.ipv4.conf.default.send_redirects to 0 per STIG security requirements" >> /etc/sysctl.conf
echo "net.ipv4.conf.default.send_redirects = 0" >> /etc/sysctl.conf
fi
## Item: Disable Kernel Parameter for Sending ICMP Redirects for All Interfaces - CCE-27004-1 - Unknown (passed)
# if grep --silent ^net.ipv4.conf.all.send_redirects /etc/sysctl.conf ; then
sed -i 's/^net.ipv4.conf.all.send_redirects.*/net.ipv4.conf.all.send_redirects = 0/g' /etc/sysctl.conf
else
echo "" >> /etc/sysctl.conf
echo "# Set net.ipv4.conf.all.send_redirects to 0 per security requirements" >> /etc/sysctl.conf
echo "net.ipv4.conf.all.send_redirects = 0" >> /etc/sysctl.conf
fi
## Disable Kernel Parameter for IP Forwarding - CCE-26866-4 - Unknownn (passed)
% Note: no fix on this was needed
# if grep --silent ^net.ipv4.ip_forward /etc/sysctl.conf ; then
sed -i 's/^net.ipv4.ip_forward.*/net.ipv4.ip_forward = 0/g' /etc/sysctl.conf
else
echo "" >> /etc/sysctl.conf
echo "# Set net.ipv4.ip_forward to 0 per STIG security requirements" >> /etc/sysctl.conf
echo "net.ipv4.ip_forward = 0" >> /etc/sysctl.conf
fi
## Need to set sysctl as well as changing the sysctl.conf (only read at startup)
# sysctl -w net.ipv4.ip_forward=0
## Item: Disable Kernel Parameter for Accepting Source-Routed Packets for All Interfaces - CCE-27037-1 - Unknown (passed)
# if grep --silent ^net.ipv4.conf.all.accept_source_route /etc/sysctl.conf ; then
sed -i 's/^net.ipv4.conf.all.accept_source_route.*/net.ipv4.conf.all.accept_source_route = 0/g' /etc/sysctl.conf
else
echo "" >> /etc/sysctl.conf
echo "# Set net.ipv4.conf.all.accept_source_route to 0 per STIG security requirements" >> /etc/sysctl.conf
echo "net.ipv4.conf.all.accept_source_route = 0" >> /etc/sysctl.conf
fi
## Item: Disable Kernel Parameter for Accepting ICMP Redirects for All Interfaces - CCE-27027-2 - Unknownn (passed)
# if grep --silent ^net.ipv4.conf.all.accept_redirects /etc/sysctl.conf ; then
sed -i 's/^net.ipv4.conf.all.accept_redirects.*/net.ipv4.conf.all.accept_redirects = 0/g' /etc/sysctl.conf
else
echo "" >> /etc/sysctl.conf
echo "# Set net.ipv4.conf.all.accept_redirects to 0 per security requirements" >> /etc/sysctl.conf
echo "net.ipv4.conf.all.accept_redirects = 0" >> /etc/sysctl.conf
fi
## Item: Disable Kernel Parameter for Accepting Secure Redirects for All Interfaces - CCE-26854-0 - Unknown (passed)
# if grep --silent ^net.ipv4.conf.all.secure_redirects /etc/sysctl.conf ; then
sed -i 's/^net.ipv4.conf.all.secure_redirects.*/net.ipv4.conf.all.secure_redirects = 0/g' /etc/sysctl.conf
else
echo "" >> /etc/sysctl.conf
echo "# Set net.ipv4.conf.all.secure_redirects to 0 per security requirements" >> /etc/sysctl.conf
echo "net.ipv4.conf.all.secure_redirects = 0" >> /etc/sysctl.conf
fi
## Item: Enable Kernel Parameter to Log Martian Packets - CCE-27066-0 - Unknown (passed)
# if grep --silent ^net.ipv4.conf.all.log_martians /etc/sysctl.conf ; then
sed -i 's/^net.ipv4.conf.all.log_martians.*/net.ipv4.conf.all.log_martians = 1/g' /etc/sysctl.conf
else
echo "" >> /etc/sysctl.conf
echo "# Set net.ipv4.conf.all.log_martians to 1 per security requirements" >> /etc/sysctl.conf
echo "net.ipv4.conf.all.log_martians = 1" >> /etc/sysctl.conf
fi
## Item: Disable Kernel Parameter for Accepting Source-Routed Packets By Default - CCE-26983-7 - Unknown (passed)
# if grep --silent ^net.ipv4.conf.default.accept_source_route /etc/sysctl.conf ; then
sed -i 's/^net.ipv4.conf.default.accept_source_route.*/net.ipv4.conf.default.accept_source_route = 0/g' /etc/sysctl.conf
else
echo "" >> /etc/sysctl.conf
echo "# Set net.ipv4.conf.default.accept_source_route to 0 per security requirements" >> /etc/sysctl.conf
echo "net.ipv4.conf.default.accept_source_route = 0" >> /etc/sysctl.conf
fi
## Item: Disable Kernel Parameter for Accepting ICMP Redirects By Default - CCE-27015-7 - Unknown (passed)
# if grep --silent ^net.ipv4.conf.default.accept_redirects /etc/sysctl.conf ; then
sed -i 's/^net.ipv4.conf.default.accept_redirects.*/net.ipv4.conf.default.accept_redirects = 0/g' /etc/sysctl.conf
else
echo "" >> /etc/sysctl.conf
echo "# Set net.ipv4.conf.default.accept_redirects to 0 per security requirements" >> /etc/sysctl.conf
echo "net.ipv4.conf.default.accept_redirects = 0" >> /etc/sysctl.conf
fi
## Item: Disable Kernel Parameter for Accepting Secure Redirects By Default - CCE-26831-8 - Unknown (passed)
# if grep --silent ^net.ipv4.conf.default.secure_redirects /etc/sysctl.conf ; then
sed -i 's/^net.ipv4.conf.default.secure_redirects.*/net.ipv4.conf.default.secure_redirects = 0/g' /etc/sysctl.conf
else
echo "" >> /etc/sysctl.conf
echo "# Set net.ipv4.conf.default.secure_redirects to 0 per security requirements" >> /etc/sysctl.conf
echo "net.ipv4.conf.default.secure_redirects = 0" >> /etc/sysctl.conf
fi
## Item: Enable Kernel Parameter to Ignore ICMP Broadcast Echo Requests - CCE-26883-9 - Unknown (passed)
# if grep --silent ^net.ipv4.icmp_echo_ignore_broadcasts /etc/sysctl.conf ; then
sed -i 's/^net.ipv4.icmp_echo_ignore_broadcasts.*/net.ipv4.icmp_echo_ignore_broadcasts = 1/g' /etc/sysctl.conf
else
echo "" >> /etc/sysctl.conf
echo "# Set net.ipv4.icmp_echo_ignore_broadcasts to 1 per security requirements" >> /etc/sysctl.conf
echo "net.ipv4.icmp_echo_ignore_broadcasts = 1" >> /etc/sysctl.conf
fi
## Item: Enable Kernel Parameter to Ignore Bogus ICMP Error Responses - CCE-26993-6 - Unknown (passed)
# if grep --silent ^net.ipv4.icmp_ignore_bogus_error_responses /etc/sysctl.conf ; then
sed -i 's/^net.ipv4.icmp_ignore_bogus_error_responses.*/net.ipv4.icmp_ignore_bogus_error_responses = 1/g' /etc/sysctl.conf
else
echo "" >> /etc/sysctl.conf
echo "# Set net.ipv4.icmp_ignore_bogus_error_responses to 1 per security requirements" >> /etc/sysctl.conf
echo "net.ipv4.icmp_ignore_bogus_error_responses = 1" >> /etc/sysctl.conf
fi
## Item: Enable Kernel Parameter to Use TCP Syncookies - CCE-27053-8 - Unknown (passed)
# if grep --silent ^net.ipv4.tcp_syncookies /etc/sysctl.conf ; then
sed -i 's/^net.ipv4.tcp_syncookies.*/net.ipv4.tcp_syncookies = 1/g' /etc/sysctl.conf
else
echo "" >> /etc/sysctl.conf
echo "# Set net.ipv4.tcp_syncookies to 1 per security requirements" >> /etc/sysctl.conf
echo "net.ipv4.tcp_syncookies = 1" >> /etc/sysctl.conf
fi
## Item: Enable Kernel Parameter to Use Reverse Path Filtering for All Interfaces - CCE-26979-5 - Unknown (passed)
# if grep --silent ^net.ipv4.conf.all.rp_filter /etc/sysctl.conf ; then
sed -i 's/^net.ipv4.conf.all.rp_filter.*/net.ipv4.conf.all.rp_filter = 1/g' /etc/sysctl.conf
else
echo "" >> /etc/sysctl.conf
echo "# Set net.ipv4.conf.all.rp_filter to 1 per security requirements" >> /etc/sysctl.conf
echo "net.ipv4.conf.all.rp_filter = 1" >> /etc/sysctl.conf
fi
## Item: Enable Kernel Parameter to Use Reverse Path Filtering by Default - CCE-26915-9 - Unknown (passed)
# if grep --silent ^net.ipv4.conf.default.rp_filter /etc/sysctl.conf ; then
sed -i 's/^net.ipv4.conf.default.rp_filter.*/net.ipv4.conf.default.rp_filter = 1/g' /etc/sysctl.conf
else
echo "" >> /etc/sysctl.conf
echo "# Set net.ipv4.conf.default.rp_filter to 1 per security requirements" >> /etc/sysctl.conf
echo "net.ipv4.conf.default.rp_filter = 1" >> /etc/sysctl.conf
fi
## Item: Disable Accepting IPv6 Redirects - CCE-27166-8 - Unknown (passed)
# if grep --silent ^net.ipv6.conf.default.accept_redirects /etc/sysctl.conf ; then
sed -i 's/^net.ipv6.conf.default.accept_redirects.*/net.ipv6.conf.default.accept_redirects = 0/g' /etc/sysctl.conf
else
echo "" >> /etc/sysctl.conf
echo "# Set net.ipv6.conf.default.accept_redirects to 0 per security requirements" >> /etc/sysctl.conf
echo "net.ipv6.conf.default.accept_redirects = 0" >> /etc/sysctl.conf
fi
## The above setting does not work - instead disable ipv6
# in /etc/sysconfig/network: NETWORKING_IPV6=no
# in /etc/sysconfig/network-scripts/ifcfg-eth#: IPV6INIT=no
# Disable ip6tables: chkconfig --level 345 ip6tables off
## Item: Disable DCCP Support - CCE-26448-1 - Failed (passed)
# echo "install dccp /bin/false" > /etc/modprobe.d/dccp.conf
## Item: Disable SCTP Support - CCE-26410-1 - Failed (passed)
# echo "install sctp /bin/false" > /etc/modprobe.d/sctp.conf
## Item: Disable RDS Support - CCE-26239-4 - Failed (passed)
# echo "install rds /bin/false" > /etc/modprobe.d/rds.conf
## Item: Disable TIPC Support - CCE-26696-5 - Failed (passed)
# echo "install tipc /bin/false" > /etc/modprobe.d/tipc.conf
## Item: Ensure Log Files Are Owned By Appropriate User - CCE-26812-8 - Fail (passed)
# chown root /var/log/*
% The following exceptions are noted
ntpstats/ user = ntp [<-- by default, ntpd runs as ntp:ntp, see /etc/sysconfig/ntpd]
radius/ user = radiusd [<-- by default, radiusd runs as radiusd:radiusd, see /etc/raddb/radiusd.conf]
## Item: Ensure Log Files Are Owned By Appropriate Group - CCE-26821-9 - Fail (passed)
# chgrp root /var/log/*
% The following exceptions are noted
ntpstats/ group = ntp [<-- by default, ntpd runs as ntp:ntp, see /etc/sysconfig/ntpd]
radius/ group = radiusd [<-- by default, radiusd runs as radiusd:radiusd, see /etc/raddb/radiusd.conf]
btmp group = utmp [<-- by default, not rwx by group other]
gdm/ group = gdm [<-- by default, not rwx by group other]
wtmp group = utmp [<-- by default, not wx by group other]
## Item: Ensure System Log Files Have Correct Permissions - CCE-27190-8 - Fail (passed)
# find /var/log -type d -exec chmod 700 {} \;
# find /var/log -type f -exec chmod 600 {} \;
## Item: Record attempts to alter time through adjtimex - CCE-26242-8 - Unknown (passed)
## Item: Record attempts to alter time through settimeofday - CCE-27203-9 - Unknown (passed)
## Item: Record Attempts to Alter Time Through stime - CCE-27169-2 - Unknown (passed)
## Item: Record Attempts to Alter Time Through clock_settime - CCE-27170-0 - Unknown (passed)
## Item: Record Events that Modify the System's Discretionary Access Controls - chmod - CCE-26280-8 - Unknown (passed)
## Item: Record Events that Modify the System's Discretionary Access Controls - chown - CCE-27173-4 - Unknown (passed)
## Item: Record Events that Modify the System's Discretionary Access Controls - fchmod - CCE-27174-2 - Unknown (passed)
## Item: Record Events that Modify the System's Discretionary Access Controls - fchmodat - CCE-27175-9 - Unknown (passed)
## Item: Record Events that Modify the System's Discretionary Access Controls - fchown - CCE-27177-5 - Unknown (passed)
## Item: Record Events that Modify the System's Discretionary Access Controls - fchownat - CCE-27178-3 - Unknown (passed)
## Item: Record Events that Modify the System's Discretionary Access Controls - fremovexattr - CCE-27179-1 - Unknown (passed)
## Item: Record Events that Modify the System's Discretionary Access Controls - fsetxattr - CCE-27180-9 - Unknown (passed)
## Item: Record Events that Modify the System's Discretionary Access Controls - lchown - CCE-27181-7 - Unknown (passed)
## Item: Record Events that Modify the System's Discretionary Access Controls - lremovexattr - CCE-27182-5 - Unknown (passed)
## Item: Record Events that Modify the System's Discretionary Access Controls - lsetxattr - CCE-27183-3 - Unknown (passed)
## Item: Record Events that Modify the System's Discretionary Access Controls - removexattr - CCE-27184-1 - Unknown (passed)
## Item: Record Events that Modify the System's Discretionary Access Controls - setxattr - CCE-27185-8 - Unknown (passed)
# cd /etc/audit
# rm {rules.d,}/audit.rules
# cp /usr/share/doc/audit-2.3.7/stig.rules audit.rules
# Item: Ensure auditd Collects Information on Kernel Module Loading and Unloading - CCE-26611-4 - Fail (passed)
# vi /etc/audit/audit.rules (<- uncomment the lines below)
--
-w /sbin/insmod -p x -k modules
-w /sbin/rmmod -p x -k modules
-w /sbin/modprobe -p x -k modules
-a always,exit -F arch=b32 -S init_module -S delete_module -k modules
-a always,exit -F arch=b64 -S init_module -S delete_module -k modules
--
##
# vi /etc/audit/audit.rules (<- add rmdir to the lines below)
--
-a always,exit -F arch=b32 -S rmdir -S unlink -S unlinkat -S rename -S renameat -F auid>=500 -F auid!=4294967295 -k delete
-a always,exit -F arch=b64 -S rmdir -S unlink -S unlinkat -S rename -S renameat -F auid>=500 -F auid!=4294967295 -k delete
--
## Item: Ensure auditd Collects Information on the Use of Privileged Commands - CCE-26457-2 - Fail (passed)
# fs="/ /boot /export/home /tmp /usr /var /var/log /var/log/audit"
# find $fs -xdev -type f -perm -4000 -o -type f -perm -2000 > /tmp/suid-files.txt 2>/dev/null
# for i in $(cat /tmp/suid-files.txt)
do
echo "-a always,exit -F path=$i -F perm=x -F auid>=500 -F auid!=4294967295 -k privileged" >> /etc/audit/rules.d/suid-files.rules
done
## Item: Uninstall Sendmail Package - CCE-27515-6 - Fail (passed)
# yum erase sendmail
## Item: Configure LDAP Client to Use TLS For All Transactions - CCE-26690-8 - Fail (passed)
# cp -p /etc/pam_ldap.conf{,.preSTIG}
# vi /etc/pam_ldap.conf
--
ssl start_tls (<- uncomment line)
--
## Item: Configure Certificate Directives for LDAP Use of TLS - CCE-27189-0 - Fail (passed)
# vi /etc/pam_ldap.conf
--
tls_cacertdir /etc/ssl/certs (<- uncomment line)
--
## Item: Enable Logging of All FTP Transactions - CCE-27142-9 - Fail (passed)
# cp -p /etc/vsftpd/vsftpd.conf{,.preSTIG}
# vi /etc/vsftpd/vsftpd.conf
--
xferlog_std_format=NO (<- changed from YES)
log_ftp_protocol=YES (<- added at end of file)
--
## Item: Create Warning Banners for All FTP Users - CCE-27145-2 - Fail (passed)
# vi /etc/vsftpd/vsftpd.conf
--
banner_file=/etc/issue (<- added at end of file)
--
## Item: Configure SNMP Service to Use Only SNMPv3 or Newer - CCE-27365-6 - Fail (passed)
## Item: Ensure Default Password Is Not Used - CCE-27593-3 - Fail (passed)
# cp -p /etc/snmp/snmpd.conf{,.preSTIG}
# vi /etc/snmp/snmpd.conf
--
# com2sec notConfigUser default public (<- comment line out)
--
## Item: Add noexec Option to Removable Media Partitions - CCE-27196-5 - Fail (passed)
# vi /etc/fstab
/dev/cdrom /media/cdrom iso9660 noauto,owner,ro,noexec 0 0
# vi /etc/auto.misc
cd -fstype=iso9660,ro,nosuid,nodev,noexec :/dev/cdrom
--
## Item: Install Intrusion Detection Software - CCE-27409-2 - Not Checked (passed)
# yum install dialog.x86_64
# rpm -Uvh rsiide-for-linux-srv-9.1.0.0-1.0.noarch.rpm
##Add the following to /etc/audit/audit.rules
-w /sbin/shutdown -p x
-w /sbin/init -p x
##Fix selinux bug with log rotation
#semodule -i /etc/RSIIDE_Config/RSIIDE_SELINUX_RHEL6_NFS.pp
#semodule -i /etc/RSIIDE_Config/RSIIDE_SELINUX_RHEL6_DEFAULT.pp
## Add the following to /Audit/config/linux.systems.txt localhost
## Modify /Audit/config/rsiide.linux.conf
wh_starting_hour:5
wh_ending_hour:20
cli_INSTALL Clamav installed (yes or no):no
uvd_PATH to binary:/usr/local/uvscan
uvi_INSTALL Mcafee installed (yes or no):yes
## Item: Verify that System Executables Have Root Ownership - CCE-27623-8 - Fail (passed)
## cd to each directory (/bin, /usr/bin, /usr/local/bin, /sbin/usr/sbin, /usr/local/sbin) and run the following:
# find . \! -user root -print
% The following exceptions are noted
/usr/sbin RPMs owned by amandabackup [<-- by default, amandabackup is a service account with no password set]
## Item: Uninstall xinetd Package - CCE-27005-8 - Fail (mitigated)
## Verify xinetd is chkconfig off for all runlevels
# chkconfig --list |grep xinetd
## chkconfig xinetd for all runlevels
# chkconfig --level 0123456 xinetd off
# Verify all xinetd services (/etc/xinetd.d) have setting "disable = yes"
## Item: Uninstall tftp-server Package - CCE-26946-4 - Fail (mitigated)
## Verify /etc/xinetd.d/tftp has setting "disable = yes"
## Set the default run level to 3 (no X11)
# vi /etc/inittab
id:3:initdefault:
## Disable X11 by setting the default run level to 3 (no X11)
# vi /etc/inittab
id:3:initdefault:
## Run the following command to see what has changed
# rpm -Va |grep '^..5'